Sourdough enthusiasts know every bubbly jar tells a story, and much of it revolves around hydration in starters. It’s the difference between a starved, sluggish culture and an energized, aromatic one. Paying attention to hydration in starters creates more consistent rises, textures, and flavors in wild sourdough projects.
Understanding wild fermentation isn’t just for artisan bakers—hydration in starters directly affects how sourdough behaves, tastes, and grows. Getting the water-flour balance right means fewer failed loaves and more reliable, happy baking sessions. The wrong ratio can introduce issues difficult to troubleshoot later.
Let’s dive into the science of hydration in starters. This guide offers clear rules, specific steps, and hands-on checklists to get your wild fermented sourdough bubbling with life. Whether you’re just starting out or fine-tuning a legacy starter, you’ll find practical advice worth applying today.
Setting Hydration Foundations for a Wild Sourdough Starter
Committing to proper hydration in starters ensures lively fermentation and consistent bread structure. The starter’s water-to-flour ratio establishes everything from microbial activity to the eventual open crumb in finished loaves.
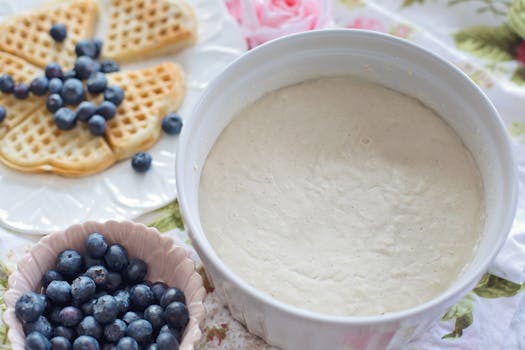
A starter with a 100 percent hydration level, for example, receives equal weights of water and flour. You’ll notice how easily the mixture stirs, and the microbubbles form rapidly after feeding. Tangy aromas emerge faster as hydration in starters climbs.
Using a Scale for Accurate Measurements
Grab a digital kitchen scale and set a bowl to zero. Pour in 50 grams each of flour and water—precision matters for reliable hydration in starters.
After stirring the mixture thoroughly, check for smoothness with a spoon. A scoopable texture signals correct hydration; lumps suggest flour buildup or a wrong ratio.
By weighing every feed, you avoid minor errors that can disrupt the starter’s yeast and bacteria balance. Consistent hydration leads to stable activity across feedings.
Visual Clues: Monitoring Starter Hydration Day by Day
In the first 12 hours post-feed, active wild sourdough will rise by about a third if hydration in starters is appropriate. Look for web-like gluten threads as a sign of robust activity.
Sticky surfaces and tiny air pockets tell you the culture retains water efficiently. If the texture is dry or breaks easily, try increasing water by 5 to 10 grams.
A properly hydrated starter falls back into its jar after rising, leaving behind streaks. This collapse means gas filled the structure and hydration in starters is supporting fermentation.
Troubleshooting with Table Comparisons
| Hydration Percent | Texture | Fermentation Speed | What to Do Next |
|---|---|---|---|
| 50% | Stiff, hard to stir | Slow | Increase water by 5-10g every feed |
| 75% | Thick, dough-like | Moderate | Test for elasticity; add water if needed |
| 100% | Smooth, spoonable | Fast | Maintain ratio; monitor rise and bubbles |
| 125% | Pourable, like pancake batter | Very fast | Track aroma and sourness; stabilize flour amount |
| 140%+ | Liquid, separates quickly | Unpredictable | Reduce water; risk of off odors increases |
Evaluating Water Sources for Starter Hydration
Choosing the right water safeguards wild yeast and bacteria in wild fermentation. Water hardness, temperature, and mineral content all impact how hydration in starters supports healthy cultures and fermentation curves.
Filtered, dechlorinated water prevents chlorine from inhibiting microbial growth. Room-temperature water (around 70°F) allows yeast and bacteria to thrive. Home bakers report faster activity after switching to filtered sources and consistent water temperatures for each feeding.
Checklist: Ensuring Optimal Water Quality
- Test local tap water for chlorine—if present, switch to filtered, bottled, or let tap water sit overnight to dissipate chlorine. This prevents starter slowdown and off-flavors.
- Keep water temperature consistent. Aim for 68°F to 74°F. Use a thermometer if unsure. Warm water boosts yeast development during cooler seasons.
- Avoid distilled water as it can strip essential minerals. Wild yeasts depend on nutrients for flourishing. Mineral balance strengthens gluten and fermentation power.
- If your starter is sluggish, experiment by using spring water for several feedings. Anecdotes show vitality returns when trace minerals are reintroduced.
- Track results in a baking journal or app. Compare starter growth, aroma, and rise after any water source changes to solidify the best option for hydration in starters.
Starter hydration is directly tied to water source choices. Sticking to a reliable, mineral-rich supply empowers consistent sourdough results and a thriving kitchen culture.
Checklist: Adapting to Seasonal Changes in Hydration
- Warm months accelerate fermentation. Decrease water by 5% for a thicker, slower starter that won’t over-ferment on hot days.
- Cold seasons require higher hydration. Increase water slightly to ensure the starter doesn’t become brittle or stop rising completely in chilly kitchens.
- If your starter seems sluggish after seasonal shifts, adjust feeding frequency in addition to hydration tweaks. Watch for smaller bubbles or slower rise.
- Keep starter jars in insulated bags near a warm appliance during winter. Looser hydration in starters can help activity overcome seasonal drop-offs.
- Evaluate aroma and appearance after any hydration change—pale, dried starters may need more water; bubbly, overactive starters might need a reduction. Observe and adapt.
Treating hydration as a flexible routine creates a resilient wild sourdough culture regardless of season or water supply. Make careful notes for smoother transitions and tastier loaves year-round.
Recognizing and Responding to Starter Textures
Learning to understand the tactile feedback of hydration in starters saves time and guesswork. Each wild fermentation sourdough signals its status through feel and appearance after each feeding.
Once you mix in flour and water, run your finger along the surface: a hydrated starter barely resists while your finger glides. Cracked, rigid doughs call for an immediate water boost.
Interpreting Smells and Visual Cues
Active wild starters emit nutty, slightly tangy aromas after each feeding. Sharp vinegar smells suggest under-hydration or stressed yeast. Adjust hydration in starters gradually if aromas become off-putting.
Check for color changes. Healthy starter surfaces remain pale with scattered brown flecks. Deep darkening or pink hues indicate unwanted bacteria due to incorrect hydration or contamination.
Visual rise and even spread in the jar offers clear confirmation hydration in starters is at its best. If rises falter, revisit your water-flour ratio.
Scenario: Corrective Steps When Hydration Falters
Imagine a starter that won’t double, even after 8–12 hours. You notice it’s dense and tears when stirred. Add 10% more water for the next feed and observe.
If the starter turns soupy yet still stays stagnant, increase feeding frequency instead. Thin starters risk going dormant with excess water but too few nutrients. Hydration in starters works best in tandem with feeding rhythm.
Observe for three feeds: successful adjustments bring a dome of bubbles and a slight wobble when shaken by day three, penciling renewed strength into your wild fermentation routine.
Fine-Tuning Hydration For Advanced Flavor Development
Altering hydration in starters is a powerful lever for flavor complexity in wild sourdough. Higher hydration tends to promote lactic acid bacteria, leading to mild, yogurt-like notes, while lower hydration encourages sharper acetic tang.
Experiment with hydration levels by splitting your starter across two jars: keep one at 80% and another at 120%. After a week, bake test loaves with each; taste for bread that matches your desired flavor spectrum.
Boosting Fermentation Speed with Adjusted Hydration
Want bread to proof faster for early morning bakes? Bump starter hydration by 10%. Warmer, looser starters ferment dough quickly, ideal for quick-turn recipes or short winter days with limited daylight.
Observe proofing times and note if dough doubles within expected windows. Hydration in starters supports responsive baking schedules—a must for spontaneous or busy bakers wanting fresh loaves on demand.
Reduce hydration for longer, slower fermentation when aiming for chewiness and robust crusts. Cooler, thicker starters slow yeast and boost enzymatic flavor buildup, sharpening wild sourdough’s signature profile.
Manipulating Sourness and Aroma Through Hydration
Some bakers crave a tart sourdough kick, while others prefer subtle notes. Adjusting hydration in starters helps shape this outcome: thick, low-hydration starters push tangy acetic acids; wetter mixes invite mellow, milky aromas.
Try the following script: “Today, I’ll feed half my starter at 60% hydration and the other half at 120%. I’ll sniff and taste each after three days.” Document the shifts and stick with the ratio that best matches your bread’s character.
Keep a flavor log alongside your feeding schedule. Match hydration changes to loaf characteristics for ongoing, delicious adjustments that deliver exactly what your family or customers request.
Conclusion: Continuing the Hydration Journey in Your Wild Fermentation
Embracing the science of hydration in starters invites continual learning, delicious experiments, and adapting routines. Each tweak brings new insights into flavor, texture, and consistency in wild sourdough baking.
Starter health rests on small choices: how you measure water, select flour, and observe texture each time. Confidence in hydration techniques grows as you witness starter resilience and bread character flourish over time.
Wild fermentation creates endless opportunities for discovery. Keep a careful eye on hydration in starters, stay curious about your results, and celebrate every bubbly jar as a step toward bread perfection.
Frequently Asked Questions
What hydration level is best for beginner wild sourdough starters?
A 100% hydration level (equal weights flour and water) supports a robust balance of yeast and bacteria. This ratio ensures an easy-to-stir texture and consistent fermentation—perfect for beginners learning to recognize healthy starter activity.
How can I tell if my hydration in starters is correct?
Look for a smooth, spoonable mixture that rises and falls reliably between feeds. Tiny bubbles, mild acidity, and a pleasant aroma mean your hydration in starters is properly supporting wild fermentation. Adjust water if texture becomes dry or soupy.
Should I use tap, filtered, or bottled water for hydration in starters?
Filtered, non-chlorinated water is best, as chlorine hinders microbial growth. Let tap water sit overnight to dissipate chlorine. Spring water’s natural minerals can enhance fermentation, but avoid distilled water, which lacks vital nutrients for wild yeast.
Is it safe to change hydration in starters seasonally?
Absolutely. Increase water slightly during dry, cold months to compensate for kitchen conditions. In warm, humid seasons, lower hydration by 5–10% to prevent overfermentation. Always make changes gradually, observing aroma, appearance, and activity after each adjustment.
How does hydration in starters impact bread crumb and crust?
Higher hydration creates an open crumb and thinner, crispier crust, ideal for rustic country loaves. Lower hydration yields a tighter crumb and chewier bite, with more pronounced sourness. Match hydration in starters to the specific result you want in your finished bread.