Imagine your wild sourdough loaf reaching its ideal tang, open crumb, and light texture. The difference between an average and exceptional bake usually comes down to fermentation timing, an art mixing observation and science.
Understanding how microbes interact with flour, water, and heat explains why timing matters for digestibility and flavor. When wild yeast and bacteria collaborate at the right pace, your sourdough emerges both tastier and easier on the gut.
This article dives into the specific steps, cues, and real-world examples for nailing fermentation timing. You’ll come away with repeatable strategies and new clarity for getting the most from your wild sourdough routines.
Building Your Sourdough with Perfect Timing Pays Immediate Dividends
Every baker wants wild sourdough that’s light, springy, and flavorful. Starting with clear fermentation timing rules changes outcomes instantly: each stage builds a foundation for digestibility and taste, and skipping or rushing results in bland, dense bread.
If your loaf lacks height or flavor complexity, it’s usually the timing—as opposed to ingredients or gadgetry—that deserves a closer look. Address this sequence and even ordinary flour transforms into something extraordinary after fermentation.
Key Milestones Mark Every Fermentation Window
Peak bulk rise, domed surface, and subtle sour fragrance signal live action in the dough. When bakers say, “My dough feels airy and pillows to a poke after four hours,” they’re tracking the visual and tactile cues of perfect fermentation timing.
Use these milestones: airy expansion, finger poke spring-back, and the first waft of a gentle tang. Mark the times and sensations in a log to find your optimal window again.
If you gently nudge sourdough and it slowly returns, fermentation has transformed starches and set you up for easier digestion. This check-in prevents under-proofing or over-extending, both killing structure or flavor.
Balancing Microbial Populations at Each Stage
Sourdough fermentation pivots on wild yeast and lactic acid bacteria growing in tandem. In the first hours, yeast produces most of the CO2 bubbles, while bacteria slowly acidify and introduce depth.
A baker who says, “I watch for slight bubbles on the sides after two hours, then get a faint tang,” is observing yeast and bacteria synchronization. Each phase builds on the last to create resilient, digestible bread.
Timed right, you avoid excess sourness (from over-acidified bacteria) or dense, gummy bread (from underdeveloped yeast), giving your loaf balanced richness and easy slicing.
| Stage | What to Look For | Common Timing | Practically, Do This |
|---|---|---|---|
| Mixing | Shaggy, sticky dough; flour just absorbed | 0–30 min | Let rest briefly for better hydration before kneading |
| Bulk Fermentation | Doubled volume, bubbles throughout, subtle dome | 3–6 hours @ warm temp | Poke test: dough springs back slowly, not instantly |
| Shaping | Smooth, cohesive, slight elasticity | After bulk, 10–20 min work | Handle gently to avoid degassing too much |
| Final Proof | Noticeable expansion, slight wrinkles, aromatic | 1–3 hours (room) or overnight (chilled) | Score before baking to control oven spring |
| Baking | Golden crust, open crumb, sour aroma | 40–50 min | Cool fully for sliceable, flavorful bread |
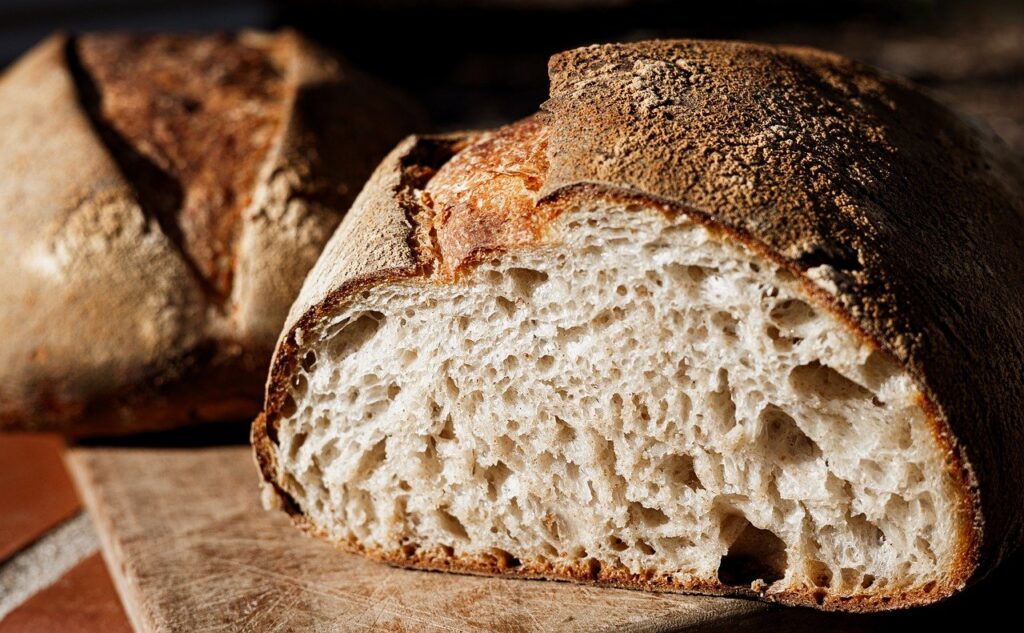
Visual Cues and Common Sourdough Timing Mistakes to Watch For
Active dough appears puffy, elastic, and aromatic at proper fermentation timing. Missing these cues risks an under-challenged or collapsed bake. Staying vigilant ensures you spot the difference before too late.
If you identify wrinkled dough or stale aromas, fermentation may be overdone. Monitor progress hourly and use natural light or gentle finger pressure to gauge readiness, not the clock alone.
Five Key Visual Cues for Judging Fermentation
Catching the ideal window means knowing a bubbling surface signals yeast activity wrapping up, while a slightly domed dough means air has been properly incorporated. Trust visual shifts over rigid timers.
- Look for bubble clusters at dough sides—this means yeast is alive and fermenting, so structure forms.
- Check elasticity by poking: dough should bounce back slowly, never deflate outright, preserving future oven rise.
- A faint, slightly sweet-acidic scent emerges—indicates balanced acid and flavor development.
- Notice the smooth, slightly glossy surface, which says gluten has developed for chewiness.
- Wrinkles or flattening warn of over-proofing; immediately consider shaping or baking to avoid collapse and density.
Integrating these cues—versus waiting on the timer—helps achieve maximum digestibility and rich flavor.
Five Common Timing Mistakes (and What to Do Instead)
React quickly if you see dense or lifeless dough. These signs speak louder than instructions on a card, showing fermentation timing needs urgent adjustment for better outcomes.
- Skipping autolyse reduces gluten formation. Instead: Rest your mix 20–40 min before kneading for extensibility.
- Cold kitchen slows fermentation. Instead: Find a warm spot (75–80F is ideal) or extend timing; check for visual cues.
- Ignoring aroma leads to miss acidic overtones. Instead: Smell frequently; when it’s tangy but pleasant, proceed.
- Punching down too aggressively de-airs dough. Instead: Be gentle to preserve gas bubbles for crumb structure.
- Proofing for exact clock times causes missed windows. Instead: Watch for dough doubling and doming before baking.
Correct timing by using the senses at every stage, and record successful attempts for future bakes.
Effects of Timing on Digestibility and Deep Flavor Profiles
Nailing fermentation timing increases both digestibility and complexity of wild sourdough. Each hour of properly paced fermentation provides time for enzymes and bacteria to work on starches and proteins, reducing gluten load and adding flavorful byproducts.
Unlike commercial bread, wild sourdough’s extended, well-timed fermentation creates crumb that’s easier to digest and loaded with subtle notes, from nutty to umami.
Digestibility Improves as Starches and Proteins Transform
During a proper fermentation window, enzymes break down large starches so your gut can more easily process the finished bread. Experienced bakers say, “My bread never sits heavy when I let the dough bulk until doubled and domed.”
This slow, steady decomposition means fewer difficult-to-digest carbs and proteins remain. People sensitive to wheat may find wild sourdough less troublesome after timing is managed carefully, making meals more comfortable.
To reinforce digestibility, maintain bulk fermentation at warm, steady temps and test finger-spring rather than rigid hours.
Acids Deepen Flavor as Timing Progresses
Balanced fermentation timing lets lactic acid bacteria and wild yeast double up, generating tangy, complex flavors without bitterness dominating. When dough sits too long, acetic acid overwhelms and sourness eclipses subtle nut, fruit, and malt hints.
Bakers recognize a “faint lemony aroma” just before the dough peaks. This marks the ideal moment to shape and proof, capturing maximum flavor depth for each batch.
Testing aroma and subtlety ensures complexity, with sweet and savory layers, rather than blunt sourness.
Adapting Fermentation Timing to Seasonal and Kitchen Variations
Getting consistent sourdough means adjusting fermentation timing for the current season or kitchen quirks. Room temperature, flour hydration, starter vigor, and even humidity change how quickly dough ferments during each bake.
Rather than panicking over recipe predictions, experienced bakers routinely say, “It’s cold, so I’ll let my dough go another hour, but watch closely for those dome and bubble cues.”
Fine-Tune with Quick Checks for Active and Slow Fermentation
In summer months, dough races to readiness. An airy, domed appearance might happen in under four hours. Keep dough cool (try a towel over the bowl in the fridge) or check hourly to avoid missing the sweet spot.
In winter, things slow considerably. Hold near a warm appliance or in a proofing box, but monitor the dough’s rise and aroma as primary measures.
This flexibility, focusing on observable dough behavior, is a necessary skill for matching fermentation timing to any kitchen environment.
Adjusting for Flour Types
High-gluten bread flours ferment a bit slower and develop stronger structure, so expect a firmer, taller loaf after optimal timing. Whole wheat or rye adds wild microbes and can ferment more aggressively—plan shorter windows, but keep an eye on surface cues and bubble activity.
When experimenting, try pairing half white and half whole wheat, tracking the difference in speed and flavor after ideal fermentation. Adjust hydration if dough grows sticky or tough.
Log every batch: flour type, ambient temp, rise times, and final crumb to identify your favorite combinations under different conditions.
Strategies for Extending or Slowing Fermentation Timing Without Sacrificing Results
Life sometimes demands slower or faster fermentation timing to fit schedules. You can adjust without sacrificing digestibility or flavor by making small, calculated tweaks at each step instead of brute-forcing hours or skipping stages.
Try refrigerating final-proofed dough for up to 24 hours for deeper flavor; the microbes keep working, but slowly. Alternatively, speed bulk fermentation using a warm (but not hot) water bath.
Checklist for Flexible, Reliable Sourdough Timing
- Use a kitchen thermometer to monitor room and dough temp. Above 75°F speeds things up, below 65°F slows down noticeably.
- Shift to a larger glass or clear plastic container to gauge bubble formation and dough rise easily.
- If you run low on time, adjust by using warmer water, but beware of overshooting rise—watch for domes.
- For longer, weekend fermentations, reduce starter amount by half and let bulk rise overnight to coax flavor without over-acidifying.
- Never shape cold, dense dough straight from the fridge—instead, let sit at room temperature for 30–60 minutes before baking.
Adapt stepwise instead of making big leaps, and always let sight, scent, and texture lead timing adjustments.
Keeping Records and Learning Your Own Wild Sourdough Rhythms
Your own kitchen will develop a rhythm as you refine fermentation timing over a dozen bakes. Track process, failures, and successes so every loaf becomes a unique data point.
Use a notebook or phone to jot the timeline, room temp, flour brand, texture, and proofing approach. Refer back to build consistency while exploring new variables.
Annual Variations Teach Bakers to Anticipate Surprises
Summer loaves burst with height, while winter bakes run longer or stall. By keeping records, you’ll spot shifts and proactively change fermentation timing by season.
When you see, “February batch rose to double in six hours, barely proofed last July in four,” react by changing water temp, proofing time, or starter ratio proactively next time.
This living log keeps your intuition sharp, blending science and muscle memory for every wild sourdough.
Using Taste Diaries to Benchmark Results
After each bake, describe crumb, crust, and aroma, rating digestibility and flavor on a simple three-star scale. This helps establish links between specific fermentation timing and sensory outcomes.
When you write, “Tang was lively but smooth after 18 hours; crumb chewy yet light,” connect to the timeline and replicate next time.
Over months, patterns appear that guide micro-adjustments during unpredictable bakes, inching each loaf closer to your ideal.
Fermentation Timing: Bringing Out the Best in Every Wild Sourdough Bake
Optimal fermentation timing acts as the behind-the-scenes hero that elevates wild sourdough. Paying attention to microbial cues, environmental changes, and your senses shapes not just digestibility, but vibrant, rich flavor in every bake.
Every small observation—from bounce-back to sour aroma—moves you toward more consistent, satisfying results. Your kitchen evolves into a living lab, where notes and daily tweaks build confidence with each rise.
Approach each step with curiosity and patience, and your wild sourdough will reward you with breads that nourish and delight—loaf after loaf, season after season.
Frequently Asked Questions
What if my sourdough doesn’t rise after several hours?
Check starter strength and ambient temperature. If both seem adequate, allow more time, but also look for bubble and dome cues, not just the clock. Sometimes minor temperature tweaks revive fermentation quickly.
Is longer fermentation always better for digestibility?
Extending fermentation can improve digestibility, but overdoing it causes dough collapse and excessive sourness. Balance time with visual cues and aroma. Stop when dough doubles and springs gently back from a poke.
Can I slow proof overnight in the fridge? Does it affect flavor?
Yes, cold proofing is common. It slows down fermentation, allowing bacteria to deepen flavor without overwhelming sourness. Let dough acclimate to room temperature before baking for better oven spring.
Should I use the same timing for all flours?
No, whole wheat and rye ferment faster due to more active microbes. Monitor rise and aroma closely, and expect shorter primary fermentation times compared to white bread flour.
How do I recover over-proofed dough?
Gently re-shape and bake slightly sooner than usual. While texture may be denser, you’ll still capture much of fermentation’s flavor benefit. Next time, monitor surface and volume changes more closely for best results.