Craving freshly baked sourdough bread without a cluttered counter? A purposeful sourdough kitchen setup frees your focus for wild fermentation and baking success. Minimalism invites greater creativity and confidence, rather than extra gadgets vying for space.
Wild fermentation sourdough calls for consistency, not complexity. The right foundational tools and habits streamline every bake—from starter feeding to shaping dough, baking, and cleaning up. A clear setup supports every loaf you share.
Read on for a practical, step-by-step approach. This guide walks you through key choices, recommended gear, workflow tips, and habits that empower you to build an efficient, reliable sourdough kitchen—one that favors wild fermentation and less stress.
Identify Essentials and Ditch the Distractions
Choosing your core set of tools means less anxiety and more reliable bread. Every choice here either enables your wild fermentation process or quietly supports your routine.
Begin with your must-haves: a sturdy mixing bowl, a kitchen scale, and a couple of dough-friendly spatulas. These simple pieces, at the heart of every successful sourdough kitchen, promote accuracy and tactile feedback during every bake.
Item-by-Item: What Earns Counter Space
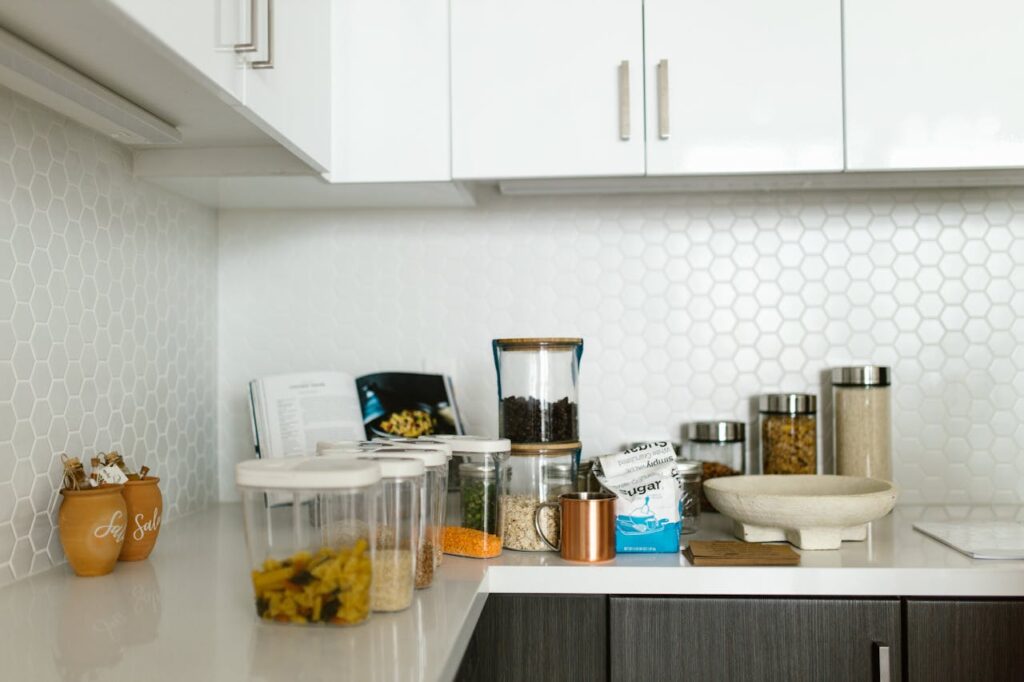
Store your starter in a clear jar, so you can see bubbles form and track its activity without opening the lid. Bread baking, especially by wild fermentation, rewards repetition and observation.
Keep a bench scraper within reach for quick dough handling. It helps portion and move sticky dough cleanly. In the minimalist sourdough kitchen, even small items serve multiple uses to avoid clutter.
A single digital scale, with clear gram readout, ensures precise flour and water measurements—no guessing or countless cups to wash. Digital readouts let you track hydration, which is critical for wild fermentation sourdough consistency.
Don’t Overbuy: Say No to Single-Use Gadgets
Skip the temptation to buy large loaf pans or uni-tasking “sourdough gadgets” that complicate cleanup. Stick to gear you’ll use for every single loaf. Extra items wind up collecting dust, not supporting baking flow.
Choose one durable Dutch oven for crisp crusts and reliable steams. One oven tool, well cared for, produces hundreds of loaves in your sourdough kitchen—with a single, straightforward cleanup step.
Use a single sharp lame (or razor) for scoring. A simple straight blade does the job if you keep it clean and store it safely. More blades do not equal better scoring results, and minimize risk of lost or dulled blades.
| Tool | Main Purpose | Minimalist Option | Action Step |
|---|---|---|---|
| Mixing Bowl | Dough mixing/fermentation | Stainless/Glass, 6qt | Select one with a wide top for easy folding |
| Kitchen Scale | Precise ingredient measurements | Digital, with gram accuracy | Keep it by your flour canister |
| Bench Scraper | Dough handling/cleanup | Stainless steel | Store by your work surface |
| Storage Jar | Starter storage/feeding | Wide-mouth, clear | Label it and wash regularly |
| Baking Vessel | Baking bread, creating crust | Cast iron Dutch oven | Reserve one shelf for it in your oven |
Organize Setup for Smooth Workflow Every Bake
A thoughtfully arranged sourdough kitchen eliminates hurry and mistakes. Arrange tools for grab-and-go movements. Store your mixing bowl below the counter, with starter jars at eye level for quick visual checks.
Keep ingredients in clear, labeled containers near your work zone. Dedicate a lightweight tray to collect flour dust and prevent stray dough from cluttering your prep area—the sign of a streamlined sourdough kitchen.
Layout Flow: Prep-to-Bake Sequence
Set your scale close to your flour container, so you can weigh straight into the bowl without shifting the counter. Scooping flour directly prevents waste and keeps cleanup easy.
- Arrange flour container, salt, and scale in a triangle for faster measuring. This configuration mirrors the step-by-step sequence when assembling dough in your sourdough kitchen.
- Keep a water pitcher or measuring cup in the refrigerator for cool hydration during summer. Chilled water slows fermentation and prevents sticky dough.
- Store bench scraper and spatula beside your sink. Easy access encourages you to scrape out sticky bowls before hand washing, reducing dough waste.
- Designate a proofing area—either a space atop the fridge or an empty shelf. Consistent spots condition you to recognize dough progress by sight and feel.
- Post a reminder or checklist inside a cupboard door: starter feed schedule, dough final proof time, or set oven timers. List your must-dos for every wild fermentation session.
If your setup feels smooth and instinctive, you’ll spend more time actually baking bread—and less on searching for tools. A consistent sourdough kitchen layout supports greater focus and enjoyment.
Prep and Proof Area: Small-Scale, Big Results
Pick a surface near your oven for shaping loaves, dusting bannetons, and scoring. The less walking required, the easier it is to keep momentum—and to limit flour spills throughout your home.
- Use a silicone mat for shaping dough; roll it up and stow it after use. Minimizes the extra wash load and guards your countertop.
- Line your bannetons with a clean, lint-free linen, changing it every few sessions for best results. A natural-fiber liner encourages gentle, even proof and prevents sticking.
- Keep a spray bottle for misting loaves or hands within reach, especially in drier climates. This helps dough handle smoothly and improves wild fermentation rise.
- Label storage containers with start dates so you can track flour freshness. Rotating ingredients makes for predictable sourdough loaves and limits spoilage.
- Add a timer (digital or dial) to your proofing area. Visibility means you can check fermentation times at a glance, reducing the risk of over-proofed or collapsed bread.
Every step, from mixing to proofing, becomes more reliable with a simple, predictable setup. Your sourdough kitchen becomes a foundation for wild fermentation success, not an obstacle.
Minimalist Equipment for Wild Fermentation Sourdough Success
True wild fermentation thrives on precise timing and reliable feedback, not endless gear. Pare down your sourdough kitchen by focusing only on equipment that improves consistency and your ability to troubleshoot dough at every stage.
Choosing Dual-Purpose Equipment
A stainless-steel bowl lets you mix, ferment, and autolyze dough in one container. You can turn this bowl over the shaped dough for bulk ferment resting, eliminating extra tools.
A glass storage jar serves as both your active starter home and your quick-status check—just look at bubbles, peaks, and rise directly through the side of the jar without opening it. Predictable sourdough starts in these easy-to-read containers.
Seek a bench scraper with a smooth edge and a flat side. Not only does it portion dough, but it also helps sweep flour off counters and decant sticky dough from the bowl during shaping.
Evaluating Need-for-Speed vs. Cleanup Burden
A simple digital thermometer, always close at hand in your sourdough kitchen, instantly tells if your dough is at ideal temperature for fermentation—without washing another device.
A multipurpose Dutch oven bakes loaves and doubles as a roasting pan, keeping your kitchen uncluttered while supporting the signature crust and steam of wild fermentation bread.
Choose tools you’ll want to clean every bake. If scrubbing feels tedious, or storing the item awkward, skip it—practical minimalism means easy maintenance in every aspect.
Your Sourdough Kitchen: Less Clutter, More Results
The minimalist approach eliminates distraction so you can focus on wild fermentation’s unique art and science. With fewer tools and a smart setup, every step—from mixing to baking—becomes less stressful and more fulfilling.
Adopting a purposeful sourdough kitchen invites discovery. Fewer gadgets mean greater freedom to perfect your starter and dough. Each loaf teaches something new when your workflow is streamlined and supportive.
Start with essentials, refine your setup, and celebrate reproducible, delicious bread from wild fermentation. The right sourdough kitchen is clear, calm, and always ready for your next hand-shaped creation.
Frequently Asked Questions
What is the simplest way to organize my sourdough kitchen?
Arrange your tools by frequency of use—store mixing bowls, starter jar, and scale within arm’s reach. Everything else can live in cabinets. Clutter-free zones boost confidence and encourage daily sourdough routines.
How should I clean and maintain my basic sourdough gear?
Scrape dough from bowls, spatulas, and scrapers right after use to avoid dried-on mess. Wash everything in warm water promptly. Air dry or towel dry for best shelf-life and reliability batch after batch.
Can wild fermentation sourdough really be made without expensive tools?
Yes. High-quality bread relies on your senses and habits, not price tags. Basic, multipurpose tools create excellent results in any sourdough kitchen. Focus on consistent measurements and dough feel for reliable loaves.
Is a proofing box necessary for minimalist sourdough?
No. Use a covered bowl or invert a pot over your dough to create a simple proofing environment. Most successful home bakers rely on stable room temperature and covered containers in their minimalist setups.
How frequently should I evaluate and declutter my sourdough kitchen?
Review your gear twice a year—spring and fall work well. Remove any tool you haven’t used in months. Regular edits keep your sourdough kitchen fresh, efficient, and always ready for the next wild fermentation project.