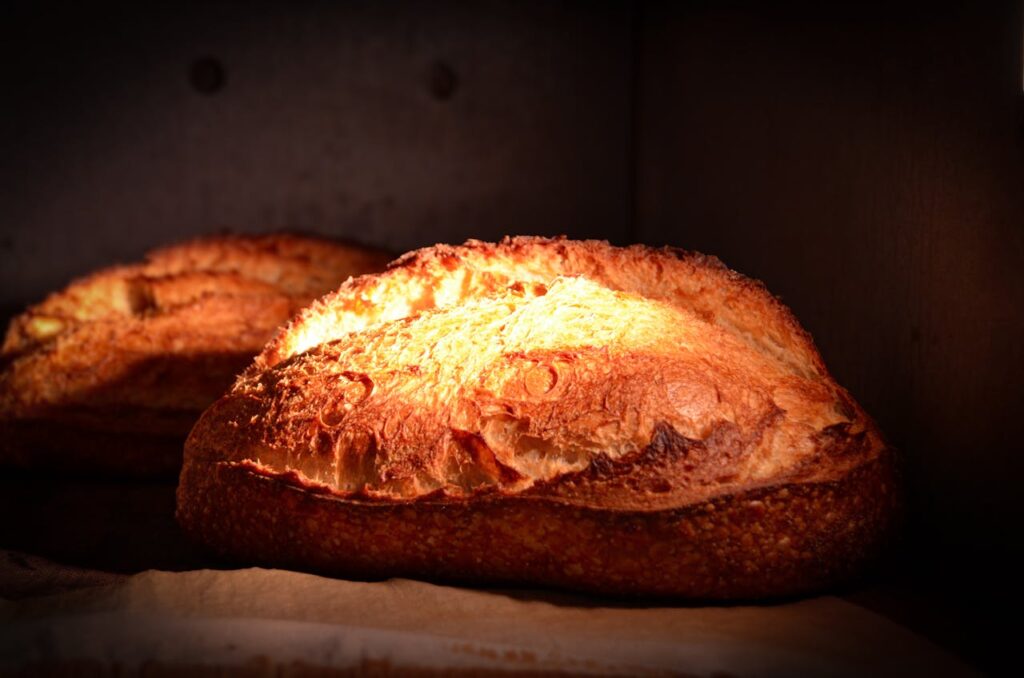
Sourdough bakers know the thrill of hearing a perfectly crisp crust crack as their loaf cools. The tool that transforms dough into that moment? Reliable dutch ovens crafted for wild fermentation sourdough success. Investing in the right vessel changes everything.
Wild fermentation sourdough relies on nuances: heat retention, steam trapping, and even how the lid fits. Dutch ovens deliver results regular baking sheets can’t touch, making them essential for bold, beautiful crusts with deep, caramelized flavor.
Ready to bake wild sourdough bread the way the pros do? This guide covers actionable tips, practical comparisons, and firsthand scenarios. Unlock new baking confidence as you discover which dutch ovens truly earn their spot in your kitchen.
Choosing Dough Rise and Crust Perfection with Dutch Ovens
To create great wild fermentation sourdough at home, start by matching your dough size to a dutch oven with ample room for spring. Allowing enough height and width is non-negotiable for a bold, crisp crust.
Home bakers should prioritize a dutch oven that’s at least 4 quarts and no more than 7 quarts. Too small, and the wild fermentation loaf presses against the sides; too large, and the loaf spreads, producing a shallow, pale crust.
Understanding Oven Spring in Practice
The dramatic rise seen in the first few moments of baking, called oven spring, only happens when wild fermentation sourdough isn’t confined. If your dutch oven’s walls are close, the dough’s expansion is stifled.
Picture scooping your shaped loaf into a snug container—it won’t balloon upward the same way. If you’ve uttered “Why did my sourdough go flat?” check your dutch oven’s dimensions before changing your recipe.
Allowing a hand’s width of space around the baked loaf supports bold, artistic crusts. Next bake, measure: a well-matched dutch oven delivers that desirable, deep brown ring at each edge.
Lids, Steam, and Crust Quality
Wild fermentation sourdough demands a blast of steam to build a blistered, crisp crust. A tight-fitting dutch oven lid locks in moisture, mimicking professional bakery ovens.
Bakers testing looser-fitting lids see less shine and fewer bubbles on their crust. A simple analogy: think of a tightly wrapped shower cap versus a loose one when your hair is conditioning—the snug fit always performs better.
If your crust dries prematurely or appears tough, swap lids or try a parchment round to seal steam inside. This trick instantly boosts color and texture.
| Model | Material | Lid Fit | Best Feature | Action Step |
|---|---|---|---|---|
| Classic Cast Iron | Cast Iron | Very Tight | Excellent Heat Retention | Preheat thoroughly for bold oven spring |
| Enameled Cast Iron | Enameled Iron | Tight | Easy to Clean | Use for wet wild ferment doughs |
| Ceramic Dutch Oven | Ceramic | Medium | Gentle Heat Distribution | Choose for fragile wild starters |
| Double-Handle Oven | Cast Iron | Snug | Safe Lifting | Opt for heavy loaves |
| Shallow Bread Dutch Oven | Cast Iron | Tight | Easy Loading | Great for fast, even scoring |
Dialing in Heat Retention and Bake Consistency
Consistently crisp sourdough crusts require dutch ovens that hold and distribute heat evenly. Look for thick-walled designs with sturdy bases for best wild fermentation results every bake.
Preheating makes all the difference. Set your dutch oven in the oven twenty minutes before loading the shaped sourdough. This step simulates bakery deck ovens and gives wild fermentation breads their signature crunch.
Preheating Essentials
Skip preheating, and wild fermentation sourdough often bakes pale or rises unevenly. Instead, always preheat your dutch oven—lid and all—at least 450°F for at least twenty minutes for each loaf you bake.
- Start preheating with your oven: Place an empty dutch oven inside as you turn on the oven, so both reach full temperature together for proper heat absorption.
- Set a thirty-minute timer: This ensures you won’t rush the process and accidentally skip thorough preheating. Every wild fermentation baker benefits from this discipline.
- Test for readiness: Sprinkle a few drops of water into the vessel. Rapid sizzle means your dutch oven is ready for baking wild sourdough doughs confidently.
- Use oven mitts with good grip: Safety cannot be understated. Hot dutch ovens are heavy, and careful handling ensures wild fermentation joy, not kitchen mishaps.
- Reheat fully between batches: Warm but not piping-hot vessels lose critical crisping power. Always return your empty dutch oven to the oven if baking multiple loaves back-to-back.
Following these preheating steps each time removes uncertainty and delivers crisp wild fermentation sourdough crusts every bake.
Maintaining Even Bake Temperatures
Thick-walled dutch ovens act like blanket-wrapped soup when it comes to sourdough crumb. They moderate wild fermentation temperatures, ensuring the loaf develops slowly for an open crumb and crackly crust.
- Choose heavy designs: Weight equals consistent heat for wild fermentation projects. Compare light- to heavyweight models and pick the most solid for worry-free bakes.
- Avoid aluminum: Lightweight metal cools too fast, and the wild fermentation process needs even, robust heat for the best texture and crust every time.
- Prefer thicker bases: Models with reinforced or double-ply bases absorb shocks and help wild fermentation sourdough avoid hot spots and charred bottoms altogether.
- Monitor oven racks: A centrally placed rack keeps heat swirling above and below the dutch oven, promoting crisp, wild fermentation crusts throughout.
- Ventilate the lid if needed: If loaves brown too much, crack the lid in the last ten minutes. Crisp crust develops, and steam escapes without sacrificing flavor or color.
Strategically managing heat and bake consistency ensures your wild fermentation sourdough loaves emerge golden, aromatic, and always bakery-level crispy.
Evaluating Material Types for Wild Fermentation Sourdough
Choose dutch oven materials based on how they support wild yeast, moisture, and heat. Each type offers real tradeoffs that affect sourdough’s crust, chew, and aroma. Prioritize your preferences for wild fermentation results.
Cast Iron’s Advantages for Every Bake
Traditional cast iron dutch ovens build up seasoning with use, becoming naturally nonstick. Wild fermentation bakers benefit from their rugged build, which holds heat deep into the bread’s center, ensuring pronounced, crackling crust.
If you hear someone mutter, “It sounds like gravel on the counter,” it’s likely a loaf from a seasoned cast iron vessel. Try a lightly oiled surface before your next wild fermentation bake and experience an immediate difference in crust snap.
Cleanup is straightforward. For sticking bits, use a plastic scraper while the oven is still warm; this preserves your patina and supports endless wild fermentation sourdough sessions.
Enameled Dutch Ovens for Gentle Wild Fermentation
Enameled cast iron models shine for wild fermentation sourdough that leans wetter or includes sensitive inclusions. Their smooth, non-reactive interior protects delicate wild flavors without risk of metallic overtones.
If you notice wild fermentation sourdoughs losing their tang or brightness, try an enameled model. Many bakers note clearer flavors and easier dough release after a single bake. No extra seasoning routine is required, either.
Care only requires warm water and gentle sponges. Avoid metal utensils, which scratch the enamel, and your dutch oven will look showroom-fresh after every wild fermentation bread adventure.
Shaping and Scoring Techniques for the Perfect Loaf
Consistently crisp wild fermentation sourdough requires intentional shaping and confident scoring. Every step, from bench rest to cut, affects how the dough springs and how your dutch oven delivers crust.
Pinpointing Shaping for High, Even Rises
Effective shaping gives wild fermentation sourdough tight skin and gentle surface tension. Place seam-side down in your proofing basket, then transfer into a hot dutch oven after a final rest. This ensures a proud rise and resilient crust.
If your dough spreads or the crust bakes flat, increase your shaping tenacity: a couple of proactive coil folds or a firmer pre-shape before final rest helps each wild fermentation loaf look—and sound—spectacular.
Sprinkle rice flour over your parchment or basket to prevent sticking. This trick supports tension without clinging, making for smooth transitions and crackly crust every bake.
Scoring Confidence for Controlled Oven Spring
Hold a sharp lame or razor blade at a shallow angle (45 degrees). With swift, decisive motions, slice your wild fermentation sourdough in one controlled move across the top. This directs oven spring upward, not outwards.
If you’ve whispered, “I was too tentative that time,” try a slightly deeper cut. Crispy crust and wild fermentation expansion pair best when the cut is just under a quarter-inch deep—never shallow or frayed.
Practice makes instinctive hands. After three tries, you’ll spot your signature wild fermentation score, and your dutch oven will showcase your flourishes in every loaf.
Maintenance and Longevity for Dutch Oven Success
Properly maintaining your dutch oven makes each wild fermentation sourdough session stress-free. Post-bake care eliminates sticking, staining, and rust, supporting perfect crust year after year.
Cleaning Routines After Every Bake
After cooling, wipe residue with a soft cloth or brush. Wild fermentation flour residue comes off easily if tended while warm, not cold. Avoid soaking iron vessels to prevent rust—spot clean instead for lasting performance.
If using enameled versions, a mixture of baking soda and warm water cleans wild fermentation marks gently without chipping the surface. Dry everything thoroughly to protect dutch oven integrity, especially in damper climates.
Store with the lid ajar to ensure air circulation. A wooden spoon wedged at the rim works for all dutch ovens, warding off trapped moisture and odors that could compromise wild fermentation flavors next bake.
Long-Term Storage and Replacement Strategies
Check for chips or cracks after every few wild fermentation bakes. If you see black flecks or persistent rust, sand gently and reseason cast iron; for enamel, avoid metal tools. Plan to retire any dutch oven that warps, since it won’t trap steam efficiently.
Reoil cast iron monthly after several wild fermentation sessions. Just a wipe with a neutral oil preserves its natural nonstick and crust-creating qualities. If switching between sweet and savory, bake a plain loaf to neutralize flavors.
Keep replacement costs low by rotating two dutch ovens for intensive wild fermentation schedules, letting one rest fully between bakes. This approach extends each vessel’s life and maintains wild fermentation consistency.
Building a Wild Fermentation Sourdough Routine at Home
Set up an efficient workflow for wild fermentation sourdough by prepping tools, prepping dough, preheating your dutch oven, and cooling loaves in a strategic sequence. This rhythm leads to consistent results and cheerful baking days.
Establishing Reliable Baking Rituals
Prep wild fermentation ingredients the night before, mix first thing in the morning, and let rise while you preheat your dutch oven. Shaped loaves transfer easily when routines are familiar and hands move confidently.
Designate a cooling rack space for wild fermentation loaves. Once the bake is done, immediately remove the lid to avoid soggy crusts, then lift bread to cool for at least an hour. This lock-in process rewards patience with audible crust crackle.
Take notes for each wild fermentation batch: vessel used, dough hydration, bake times, and crust color. Your sourdough “lab book” helps improve each week and spot what works best with your chosen dutch ovens.
Wildcard Dutch Oven Hacks for Busy Bakers
For packed schedules, pre-shape wild fermentation dough and refrigerate overnight. Toss straight from fridge to preheated dutch oven in the morning—no second rise on the counter needed. This method supports both flavor and crackly crust.
Line a cold dutch oven with parchment for sticky wild fermentation doughs. Transfer your proofed loaf with the parchment directly, score, and bake. Cleanup takes seconds and your wild fermentation crust stays intact every time.
Consider a silicone sling for easy removal. These affordable accessories, designed for dutch ovens, let you lift high-hydration wild fermentation loaves with zero breakage, showing off every blistered square inch of crust.
Frequently Asked Questions
Why do wild fermentation sourdough loaves need dutch ovens?
Dutch ovens trap steam during baking, mimicking professional steam-injected ovens. This process creates blistered, crisp crusts and lofty wild fermentation rises unattainable on open trays or standard baking sheets.
Is enameled cast iron better than bare cast iron for sourdough?
Both deliver wild fermentation results, but enameled types’re easier to clean and resist acidic dough corrosion. Bare cast iron, properly seasoned, gives a classic, crunchy wild fermentation crust with earthy undertones.
Can I use a dutch oven with chips or cracks for sourdough?
Avoid using heavily chipped or cracked dutch ovens for wild fermentation. Chips may impact steam retention and pose food safety risks. Small enamel nicks are manageable, but consider replacing for best wild fermentation results.
What size dutch oven is optimal for wild fermentation sourdough?
Choose 4 to 7 quart dutch ovens with sides high enough to allow “oven spring.” Oversized models can lead to flat wild fermentation loaves, while too-small vessels prevent proper expansion and crisping.
How do I prevent sticking in my dutch oven?
Dust the dutch oven interior or parchment with rice flour before lowering in your wild fermentation dough. Baking on parchment ensures quick removal, and a well-seasoned vessel adds natural nonstick for future sourdough baking.