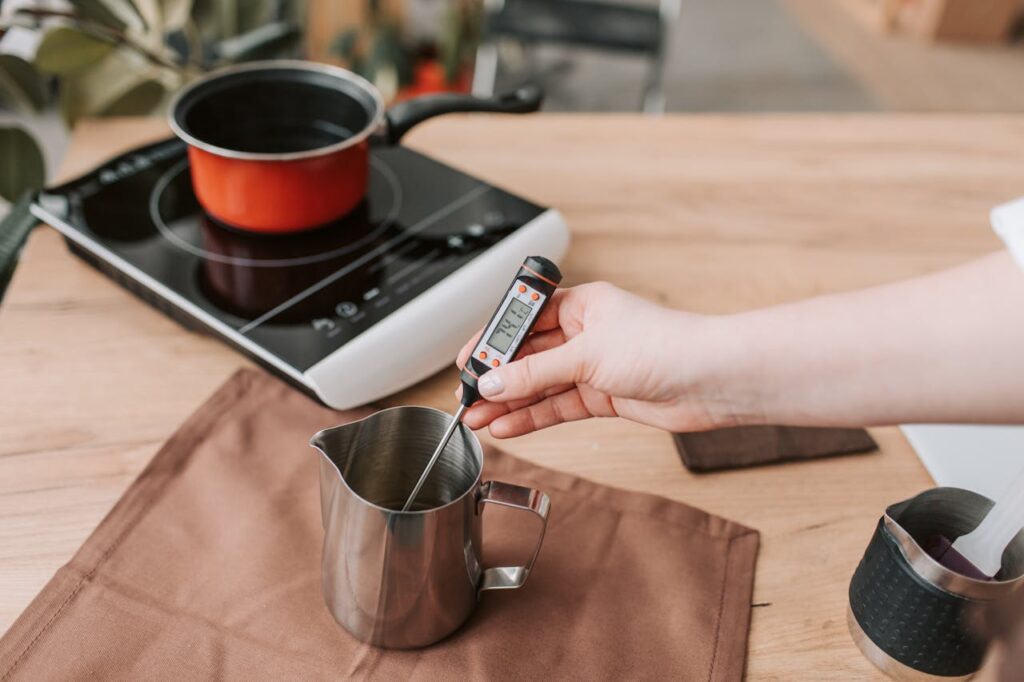
Making sourdough bread with wild fermentation is equal parts science and art. Getting each detail right builds confidence, and accurate dough temperatures unlock reliable rise and flavor. Plenty of serious bakers now call dough thermometers their secret weapon for peak results.
Wild fermentation reacts to even small fluctuations, making temperature management a top priority. The wild yeasts and bacteria work best when dough sits in an exact temperature window, and a dough thermometer gives you certainty, every step.
Ready to troubleshoot sluggish dough or boost flavor complexity? This in-depth guide explores how dough thermometers streamline the wild sourdough process, offering practical examples, tool comparisons, and actionable lists for real-kitchen success.
Pinpointing the Sweet Spot: Target Dough Temperature Essentials
Dialing in dough temperature means fewer surprises and more consistent crumb. Using dough thermometers is non-negotiable for the wild fermentation baker aiming to improve results overnight.
Accurately tracking dough temperature helps the microbes work in harmony. It keeps each stage—mix, bulk ferment, and proof—right where nature intended. The payoff is reliable flavor and texture batch after batch.
Why Temperature Rules Wild Fermentation Success
Bakers will nod in recognition—when dough is running hot in summer, wild fermentation takes off and overproofs in hours. In winter, sluggish dough can stall out before it ever builds structure.
The right dough thermometer becomes a daily tool, not just a troubleshooting device. A clear reading lets you cool or warm dough, pre-empting mishaps instead of reacting to surprises.
Bakers say things like, “It felt sticky, but the dough thermometer read 80°F, so I waited.” Use the reading as a guide, not just a confirmation, and your results will sharpen.
Setting Realistic Temperature Goals for Sourdough
Wild fermentation sourdough wants to ferment between 74°F and 78°F for balanced acid and yeast growth. Below 72°F adds tang but slows activity; above 82°F speed yeast but leaves flavor behind.
Each sourdough recipe may suggest an ideal temperature, but real-world kitchens fluctuate. Use your dough thermometer to track if adjustments are needed, like holding back water temperature or adjusting ambient room warmth.
Log your typical results at each temperature. If “my dough doubles in 5 hours at 76°F but tastes bland,” tweak until both flavor and structure align. Your thermometer provides the objective feedback to refine technique.
| Dough Stage | Recommended Temp (°F) | Action for Too Cool | Action for Too Warm | What to Watch |
|---|---|---|---|---|
| Mixing/Kneading | 74–78 | Use warm water or preheat bowl | Chill flour or use cold water | Texture, stickiness |
| Bulk Fermentation | 75–78 | Move to warmer spot | Shorten ferment time | Bubble size, extensibility |
| Proofing | 74–76 | Cover, warm oven light | Reduce proof time | Rise height, springiness |
| Final Shaping | 72–74 | Work quickly | Rest in cooler area | Handle feel, tearing |
| Baking | Varies | Preheat oven longer | Bake immediately | Score spreading, oven spring |
Choosing the Right Dough Thermometer for Your Kitchen
Having the right dough thermometer means never guessing if your dough is too cold, too hot, or just right. Let’s sort the main types and see which fit different routines.
Analog, digital, and infrared models each have pros and cons. Your choice shapes not just readings, but how fluidly you move from dough to bake with zero interruptions.
Analog, Digital, or Infrared: Matching the Tool to the Task
Analog dough thermometers work like classic kitchen tools—simple, durable, and never need batteries. Stick-style models shine for quick checks in mixing or proofing bowls.
Digital thermometers display numbers fast, which is handy in time-critical stages like check-ins during bulk fermentation. Many come waterproof for true hands-on use.
Infrared models read the surface without touching. They’re convenient during mixing, especially if you don’t want to disturb a delicate dough skin or sticky ferment.
- Pick analog if you like mechanical reliability—easy to calibrate, nothing digital to fail, pure tactile feedback.
- Choose digital for quick numbers and better accuracy—great insurance during busy bakes or multi-dough days.
- Use infrared for messy, hands-off checks—especially with high-hydration wild fermentation doughs that tend to stick or tear with probes.
- Keep more than one on hand—for cross-checks, redundancy, or simply to adapt to any wild fermentation scenario as it arises.
- Test your thermometer weekly, no matter the type. Drop in ice water and expect 32°F, or boiling water (212°F at sea level). Trust, but verify.
The right dough thermometer becomes a natural extension of your baking rhythm, not an interruption. Make swapping tools seamless by keeping each type handy and clean.
Caring for Dough Thermometers to Prolong Accuracy
Proper care preserves accuracy. Always wipe digital or analog probes after each use; bits of dough or flour can throw off readings over time.
- Wipe probes with damp cloth—don’t soak, as moisture seeps into digital housings and analog seals.
- Calibrate digital models monthly using the “ice water” and boiling checks. Look for a small adjustment screw or use calibration mode where available.
- Store upright in a clean jar or their own sheath. Don’t toss in a drawer where probes bend or sensors crack against hard edges.
- Replace batteries every six months. Keep spare batteries on hand, so the probe never fails in the middle of dough mixing.
- For infrared, clean the lens with lens wipes. Dust and fingerprints create fuzzy readings, making wild fermentation tracking unreliable.
Showing your dough thermometers the same care you give your banneton or Dutch oven ensures every batch gets the right read.
Boosting Sourdough Results with Consistent Measurements
Precision in measurement creates repeatable sourdough outcomes, letting you fine-tune wild fermentation variables with confidence. Use your dough thermometer for more than temperature—log, compare, and optimize using real data.
Compare this to a fitness tracker: without numbers, you hope for improvement but can’t spot trends. Tracking dough temperature makes progress visible and bakes reproducible.
Building a Personal Dough Temperature Log
Record your starting dough temperature, the room’s ambient temperature, bulk ferment duration, and final rise when working with wild fermentation starter.
Jot notes on how the dough feels at each stage: “felt loose at 78°F, strengthened by 77°F 3 hours later.” Over a few bakes, patterns emerge connecting measurement to texture and crumb.
With numbers and sensory notes, you’ll answer practical questions: Did a higher temp add airiness? Did cooler dough enhance sour notes? Adjust your approach, not just the recipe.
Adapting to Seasonal Changes Without Guesswork
Wild fermentation moves quickly on a summer day and drags on in winter. Expect changes, and use dough thermometers to compensate with simple, direct steps at each season’s onset.
When your kitchen hits 90°F in July, opt for ice water in your mix and cool dough with brief fridge rests. In January, gently warm water—or ferment dough tucked near a running oven.
Set a seasonal routine: log dough temperature against room temperature, then review after two or three wild fermentation cycles. This minimizes surprises and maximizes delicious results year-round.
Timing Every Stage Using Clear Dough Thermometer Readings
With precise dough thermometers, your schedule gets smoother and surprises vanish. For wild fermentation, every extra degree matters for yeast and bacteria speed during bulk or proofing.
Imagine someone saying, “My dough doubled before lunch, even though it’s cold out—it hit 76°F right after mixing.” That’s real-time information empowering real-time adjustments, not just hope.
Turning Data into Daily Bread Schedules
Write your planned mixing, shaping, and baking times alongside dough temperature goals. This transforms an abstract recipe into a living process you can adapt each day.
Check dough with your thermometer every hour during bulk ferment. If it jumps above 80°F, consider shortening total ferment time by an hour for wild fermentation sourdough. If it drops under 74°F, add time instead.
Consistent checking makes wild fermentation sourdough feel like clockwork, rather than a guessing game between over- and under-proofed loaves on different days.
Making Realistic Adjustments on the Fly
Don’t wait for problems. If your dough thermometer shows a surprise reading—too cold or too hot—take a direct step: move the bowl, adjust water temp, or alter proofing length right away.
Bakers might handle this out loud: “Thermometer shows 73°F, that needs a longer rise,” or “Jumped to 80°F, cutting proof by 30 minutes.” This makes wild fermentation predictable, not mysterious.
The more you practice fast, responsive tweaks, the less you’ll dread variables like weather or room temperature. Every bake sharpens your judgement and outcomes.
Visual and Tactile Signs Backed by Temperature Data
Combining dough thermometer readings with hands-on feedback brings wild fermentation into clear focus. Structure and feel never need to conflict with the data; instead, they complement each other.
Let visual cues confirm what temperature readings signal, so you train your intuition over time. Both approaches matter, and together, they drive skill forward in home sourdough baking.
Layering Touch with Thermometer Results
Rather than guessing if your dough is truly ready, check both the thermometer number and how the dough stretches, springs, or resists during handling.
If the dough feels slack but reads 78°F, let it ferment a touch longer. If a dough shapes up well at 75°F but looks dense, expect a longer proof—or tweak your handling method for the next bake.
With experience, you’ll say, “This feels right and matches 76°F; time to shape.” Over time, temperature checks build intuition alongside visible, tactile feedback.
Comparing Surface to Core Temperatures
Measure both surface and interior dough temperatures, especially during bulk fermentation and final proof. Surface can mislead if kitchen air is cooler or if dough formed a skin.
Insert the probe halfway into the thickest part of your dough for an accurate wild fermentation reading. Comparing both numbers lets you spot uneven heating or cooling in the process—fixable with repositioning or gentle mixing.
Insight: If core lags behind surface by 2–3°F, insulate your bowl or knead more thoroughly during mix. Bring readings in sync for best wild fermentation results every time.
Leveraging Multiple Thermometers for Pro-Level Fermentation
Using two dough thermometers—one digital, one analog—builds redundancy and verifies accuracy throughout the sourdough process. Even pros double-check to avoid stale batteries or drifted calibration spoiling a bake.
Swap between digital and analog readings during crucial steps: after mixing, halfway through bulk fermentation, and just before shaping. This ensures your wild fermentation dough is precisely where it needs to be before the next stage.
Checklist for Multi-Thermometer Backups
Follow this short script at each bake: Turn on digital, check ice water, cross-reference analog. Check both after mixing dough and after 3 hours of wild fermentation bulk.
If readings match, proceed confidently. If they disagree by more than a degree, recalibrate and trust the average. Build the habit for zero error and happy, resilient sourdough baking.
Setting Yourself Up for Every Wild Fermentation Success
Reliable wild fermentation is less about luck and more about control. By treating dough thermometers as essential—not optional—you remove guesswork, improve flavor, and build consistency across all seasons and recipes.
Using dough thermometers lets you understand not just what happens, but why. Sluggish batches, inconsistent crumb, or bland results become things of the past through direct measurement and timely adjustment.
If you’re looking to upgrade your wild fermentation, start with your dough thermometer. Track, tweak, and trust the numbers, and sourdough baking will become steadily more predictable and satisfying with every loaf.
Frequently Asked Questions
What type of dough thermometer is best for wild fermentation sourdough?
Digital dough thermometers provide quick, accurate readings that make them ideal for all sourdough bakers. For hands-free checks, add an infrared thermometer for surface readings without disturbing delicate dough structures.
How do I calibrate my dough thermometer to ensure accuracy?
To calibrate, place the thermometer in ice water (should read 32°F) and in boiling water (should read 212°F at sea level). Adjust using calibration mode or screw until accurate, and repeat monthly for best results.
How frequently should I check dough temperature while baking sourdough?
Check temperature after mixing, halfway through bulk fermentation, and before shaping. During hot or cold weather, check hourly to ensure wild fermentation stays on track, enabling timely adjustments for consistent bread outcomes.
Why does my sourdough turn dense even with the right temperature?
Temperature is one key factor, but hydration, flour strength, and fermentation timing also matter. Use the thermometer to rule out temperature issues, then experiment with water ratios or proofing times to find the perfect crumb.
Is it worth owning more than one dough thermometer?
Backing up with both digital and analog dough thermometers ensures reliability and avoids error from calibration drift or battery loss. Many experienced bakers keep both types for redundancy, improving sourdough results with every batch.