If you’ve ever watched wild fermentation sourdough rise and wondered about the role of your kitchen’s humidity, you’re in the right place. Carefully managed dough fermentation is at the heart of both rustic bread flavor and the sought-after open crumb beloved by sourdough enthusiasts.
Understanding how humidity shapes dough fermentation allows bakers to turn unpredictable variables into consistent results. In practice, this means developing sourdough loaves that are reliably airy, moist, and full of layered taste—without guesswork.
By the end of this article, you’ll spot exactly how moisture in the air changes what happens inside your dough, and how you can use these insights for deliciously reliable wild fermentation sourdough every time.
Pinpointing Humidity’s Role in Sourdough Growth
When you control ambient humidity as you nurture wild fermentation sourdough, you impact rise, crust, and crumb. Let’s break down the ways moisture in the air shifts your baking outcomes.
Increased humidity triggers faster moisture absorption by the flour during dough fermentation, leading to softer textures and more pronounced bubble formation. The difference is tangible in both feel and structure, whether working by hand or in a pro kitchen.
Moisture Uptake: What the Dough “Feels”
Picture shaping a wild fermentation sourdough in summer: the dough feels sticky fast because higher air moisture accelerates water binding. Bakers notice slick hands as the gluten network becomes hydrated more thoroughly, which in turn helps clean mixing bowls.
Compare this to a dry winter bake, where dough stays stiffer for long stretches; the water is absorbed slowly, sometimes requiring more kneading or a careful increase in hydration for smoother wild fermentation sourdough development.
In both seasons, getting a feel for this tactile feedback helps bakers adapt, keeping the dough supple with timely folds or gentle spritzes to maintain steady fermentation.
Fermentation Activity and Air Moisture Impact
During high humidity, wild fermentation sourdough activity often intensifies, with visible signs like bubbling and puffing occurring earlier in the bulk rise. Yeasts and lactic acid bacteria thrive, boosting leavening efficiency and flavor complexity all at once.
Dry conditions, on the other hand, lead to sluggish fermentation. Microbes slow down, bubbles appear later, and you may end up extending the proofing time just to capture sourdough’s full rise and flavor punch.
The ambient moisture becomes one of the primary cues for judging readiness, shifting how bakers schedule each dough fermentation step from inoculation to oven spring.
| Condition | Dough Texture | Fermentation Speed | Recommended Adjustment |
|---|---|---|---|
| High Humidity | Soft, tacky | Rapid | Shorten rise, favor gentle folds |
| Low Humidity | Firm, less elastic | Slower | Increase hydration, cover tightly |
| Room Temp (50% RH) | Balanced, smooth | Moderate | Monitor as usual, use standard recipe |
| Very Dry | Stiff, brittle | Very slow | Add water in small increments, check skin |
| Damp with Drafts | Surface sticky, interior uneven | Uneven | Shield from airflow, rebalance hydration |
Adapting Sourdough Prep for Changing Humidity
Shifting humidity levels call for timely changes in your wild fermentation sourdough approach. Responding to these variations means fewer surprises and more consistent results in flavor and crumb.
If the ambient air feels muggy or dry as you start your dough fermentation, use the following steps and reminders to stay ahead of the game—and monitor your dough for clear signs of progress.
Initial Moisture Check
As soon as flour meets water, check the dough’s hydration through touch. If it clings to fingers immediately, high humidity is assisting initial mixing. In drier periods, you’ll notice lagging absorption—add water only after resting for ten minutes to avoid excessive stickiness.
- Cover dough with a damp cloth in dry conditions to retain surface moisture and ensure even fermentation without crusting or cracking.
- Adjust ambient moisture by running a small humidifier near the workspace if your environment feels parched, giving microbes a head start in the wild fermentation sourdough process.
- Invest in a hygrometer to monitor kitchen humidity levels alongside temperature—these two cues together explain a lot about batch-to-batch variations.
- During humid periods, lightly dust your work surface with rice flour to offset increased tackiness and keep your shaping routines consistent without over-stretching gluten.
- Switch to a slightly stiffer dough recipe on stormy or summer days so that increased fermentation speed doesn’t collapse the structure before baking.
By integrating small, precise adjustments, you’ll keep wild fermentation sourdough predictable and showcase the nuances humidity can bring out in flavor and crumb.
Mixing and Early Bulk Stage
Mixing technique matters more on humid days, with dough requiring only gentle kneading before resting. For dry air, plan to mix longer or increase your water ratio by 3–5 percent for ideal texture.
- Use an oiled bowl for bulk fermentation so dough slides and expands without sticking, particularly when humidity is above 65 percent.
- Mist dough lightly between coil folds in dry climates to encourage even lifting and lower risk of torn surfaces during wild fermentation sourdough prep.
- Proof in a closed container if humidity is erratic to shield from drafts or direct air that desiccates the exterior without allowing full fermentation to develop inside.
- Take detailed notes of humidity for each bake—over time, you’ll create a personal database of wild fermentation sourdough behavior for your kitchen.
- Test whether dough bounces back halfway when poked; in high humidity, this happens sooner due to faster fermentation, acting as a real-time indicator for the next stage.
These tweaks help shape a reliable baking routine that transforms moisture from a variable into an asset for successful dough fermentation.
Reading the Signs: Practical Observations Every Baker Makes
If you work with wild fermentation sourdough through changing seasons, you’ll see the direct results of humidity shifts in dough structure and behavior from the bulk rise through shaping and scoring.
Consistent results come from watching, feeling, and responding in the moment during each dough fermentation session, using telltale signals to make small, decisive changes.
Surface Tension and “Skin” Formation
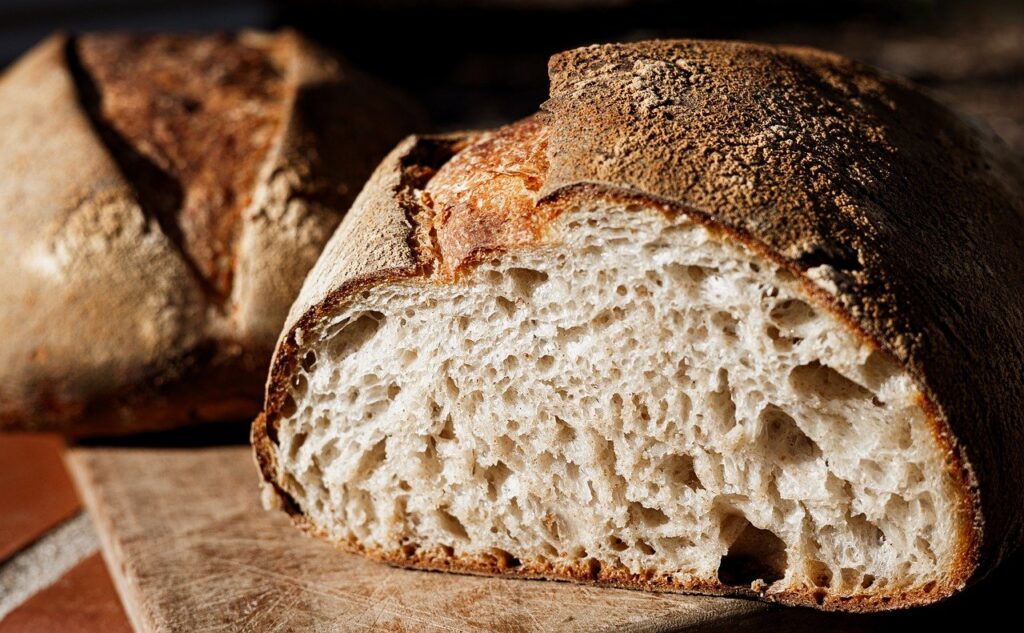
In dry air, dough quickly develops a tight ‘skin’—the surface dries out and resists stretching. This can cause cracking, make scoring unpredictable, and keep wild fermentation sourdough crumb from opening fully in the oven.
When humidity is high, the dough skin stays supple longer. It stretches with the gas bubbles, which gives open, irregular holes in slices and makes bakers say, “The crumb looks just right!”.
If you spot wrinkling or stiffness, it’s a cue to mist the surface, cover up, or adjust ambient conditions before any further proofing or shaping steps.
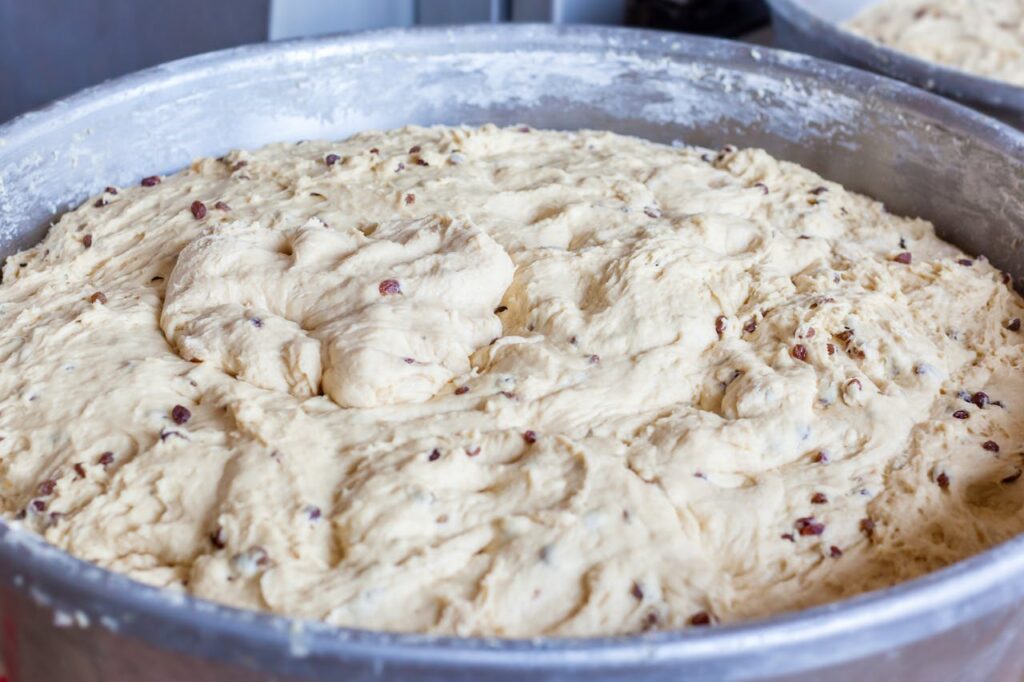
Fermentation Bubbles and Volume Gains
Wild fermentation sourdough loves ambient moisture. Bubbles appear sooner in bulk fermentation on damp days, making the dough look puffy and jiggly within three to four hours at room temperature.
Compare to a dry spell, where bubbles are fewer and develop slower—you’ll typically find yourself waiting up to an hour longer for similar volume. That shift demands patience and sometimes extra folds to build structure.
By closely watching those signals, even a beginner can fine-tune their bake and catch the optimum dough fermentation moment for a loftier, tastier loaf.
Strategic Flours and Tools for Humid and Dry Kitchens
Bakers aiming for consistent wild fermentation sourdough texture make strategic choices with their flours and toolkit based on expected humidity swings. This ensures resilience in both technique and finished product.
Flour Varieties and Absorption Rates
Hard wheat flours and whole grains naturally absorb more moisture, providing a safety margin in high-humidity environments when making wild fermentation sourdough. They also yield satisfying chew and rich flavor due to higher bran content.
On dry days, all-purpose or lower-protein flours let you increase water without risking sticky dough, supporting gentle gluten formation during dough fermentation.
Switching between flours, or blending them, is a practical way to moderate hydration ratios and ensure the dough’s resilience regardless of weather.
Kitchen Tools That Improve Outcomes
Reusable plastic lids or fermentation bins give air-tight consistency. Proofing baskets lined with cloth retain surface moisture and safeguard delicate wild fermentation sourdough skin.
Using a dough whisk keeps mixing gentle, while a basic spray bottle offers quick remedial misting to adjust surface hydration throughout every stage of dough fermentation.
A simple scale and temperature/humidity combo monitor guide tweaks to recipes and steps, helping you maintain accurate hydration no matter your kitchen’s mood.
Fine-Tuning Your Schedule for Humidity Swings
Interpreting room moisture lets you refine wild fermentation sourdough timing, so you don’t wind up with overproofed or under-fermented bread. This is vital for flavor and digestibility.
A flexible approach to rise time and rest periods makes scheduling wild fermentation sourdough simpler, regardless of sudden weather changes or indoor airflow shifts.
Shortening Bulk Fermentation During Rainy Spells
High humidity means wild fermentation sourdough rises quicker. During rainy periods or muggy summers, bakers trim up to 30 percent off their bulk proof times and look for bubbly, jiggly dough as their real guide.
Testing each batch with gentle finger pokes saves bread from deflating or breaking down before baking. A slack, sticky surface at shaping means it’s time to move fast—no second guesswork required.
This rule keeps the finished loaf light and balanced, with just the right flavor depth from fully developed dough fermentation.
Extending Rest in Dry or Air-Conditioned Homes
Chilly, dry air calls for longer proofing to let wild fermentation sourdough deepen in flavor, especially if uncovered crusts begin to form. Bakers anticipate up to an hour’s extension in these conditions.
Covering dough well or moving to a warmer, steamier part of the kitchen avoids sluggish rises and dense crumb. Every minute adds softness and character to the finished bread.
This reserve of patience pays off; dough fermentation in subtle, stable conditions yields bread that’s both wholesome and artisan-level in taste and look.
Sourdough Texture: Results You Can See and Taste
The way humidity changes wild fermentation sourdough shows up in every aspect of crumb, crust, and flavor. Bakers tune-in through slice appearance, chew, and aroma after baking.
Open Crumb and Alveolation
A humid workspace leads to loaves with open, irregular holes—what professional bakers call pronounced alveolation. This is a direct result of water-laden air feeding rapid microbial and gluten expansion during dough fermentation.
Dryer environments flatten this effect, so slices are tighter but sometimes more uniform in chew. Bakers celebrate both; they just adjust their expectations and hydration accordingly to honor the season’s influence.
Feedback from bread followers—crust ‘singing,’ crumb stretching—serves as validation. Each finished loaf tells the story of its dough fermentation journey and your response to humidity.
Flavor, Sourness, and Shelf Life
Moist air supports longer microbial action, which produces enhanced lactic acid and subtle tang in wild fermentation sourdough. Drier conditions favor mild sweetness and shorter shelf life, since fermentation is less vigorous.
Careful bakers mark subtle differences, like when their family says “How did you get this flavor today?” and trace the change back to dough fermentation pace influenced by weather.
Keep notes for each batch to learn how these tradeoffs change with humidity—over time, flavor becomes another tool in your sourdough kit.
Bringing It All Together: Practical Steps for Every Baker
Effective wild fermentation sourdough baking means welcoming humidity as a partner in the process. The outcome is reliable, flavorful loaves with texture and taste attuned to your environment.
Reading your dough—by touch, sight, and scheduling flexibility—lets you pivot smoothly, turning unpredictable weather into consistent, delicious results for every bake.
Treat each loaf as a mini-experiment in dough fermentation; keep adjusting, record notes, and share your wins with like-minded bakers who appreciate the fine balance between craft and nature.
Frequently Asked Questions
Why does my wild fermentation sourdough dough skin crack during proofing?
This usually signals dry air or under-covered dough. Keep the surface moist with a damp towel or plastic wrap—especially vital for strong dough fermentation and open crumb results.
Is it safe to increase hydration when it’s humid?
Sometimes—test by adding water just until the dough feels pliable. Wet doughs overproof quickly in high humidity, so monitor dough fermentation progress and shorten proof times after every adjustment.
How can I control humidity without special equipment?
Use closed containers or proofing bags and towel-covered bowls. For dry air, place a cup of warm water near the dough. For extra humidity, keep loaves away from direct airflow and draughts during fermentation.
Does low humidity change sourdough flavor?
Low humidity slows down fermentation, usually producing milder flavor. Expect a less sour profile and tighter crumb. You can intentionally slow proofing or use more whole grain flours for deeper taste and improved resilience.
Should I adjust my wild fermentation sourdough starter for humidity shifts?
Yes—feed your starter with a tiny bit more water when it’s dry or reduce hydration during humid spells. This helps the microbes remain active, so dough fermentation flavors and rise continue to develop consistently, regardless of season.