Imagine tearing into a warm, golden focaccia and noticing the layers of aroma that hit your senses. Wild fermented dough takes this classic bread in a bold new direction, making every bite memorable. This article shows how wild fermented dough shapes focaccia for next-level flavor.
Beautifully textured focaccia gets its depth of taste not just from the olive oil or the sea salt sprinkled on top, but from a dough alive with wild native yeasts. When wild fermentation is embraced, each loaf carries a mark of its origin—your kitchen, climate, and flour—all play starring roles.
You don’t have to be a pro baker to enjoy these results. With a spirit of curiosity and some patience, you’ll create focaccia that can’t be duplicated by packaged yeast or commercial processes. Explore the steps and secrets of wild fermented dough—the difference is unforgettable.
Bringing Wild Fermentation into Your Kitchen for Rustic Focaccia
When you use wild fermented dough, you transform focaccia from basic to complex. You’ll tap into the tradition that gives rustic breads their unmistakable aroma and personality.
Small changes in flour, temperature, and timing lead to dramatic shifts in your finished bread. Because wild fermented dough responds to its environment, each bake has its own character, even when you follow the same formula.
Preparing a Wild Starter: Getting to Know Your Microbial Allies
Begin by mixing flour and water and letting the wild yeasts and bacteria already present in the air start their work. Cover loosely and let nature run its course—watch for bubbles after a day or two.
Feed your starter by adding fresh flour and water each day. It’s like nurturing a houseplant—the starter will rise and fall, developing complexity. Within a week, the aroma sharpens and the mixture becomes active.
Trust your senses: ripe wild fermented dough typically smells tangy, feels slightly sticky, and rises predictably after each feeding. When in doubt, a spoonful dropped in water should float—ready for baking.
Environment’s Role in Fermentation: Nurturing the Perfect Conditions
Room temperature and flour choice can tweak how your starter and dough behave. Warmer rooms speed up fermentation, while whole grains add flavor complexity and nutrients.
If your kitchen is cool, don’t rush it. Extend the rise time by a few hours or let the dough rest overnight in the fridge. This slower process lets the wild fermented dough build even richer aromas.
Mature starters reward patience. On baking day, expect increased oven spring and a fragrant loaf. A reliable routine—not guesswork—brings consistent results, so jot down your exact process for future bakes.
| Aspect | Wild Fermented Dough | Commercial Yeast Focaccia | Takeaway |
|---|---|---|---|
| Aroma | Rich, complex, layered | Subtle, one-dimensional | Wild fermentation creates deep aromas |
| Flavor | Tangy, nutty, evolving | Sweet, slightly bland | Wild fermentation = unique, memorable taste |
| Texture | Open crumb, moist, chewy | Even crumb, drier | Wild dough delivers rustic softness |
| Flexibility | Adapts to flour & kitchen | Uniform across settings | Wild fermentation is kitchen-specific |
| Time Required | Longer, more patient | Short and predictable | Patience yields rewards with wild fermented dough |
Perfecting the Focaccia Mixing and Bulk Fermentation Stage
This section offers a step-by-step checklist so you nail the focaccia dough every time. Your tactile cues matter when handling wild fermented dough.
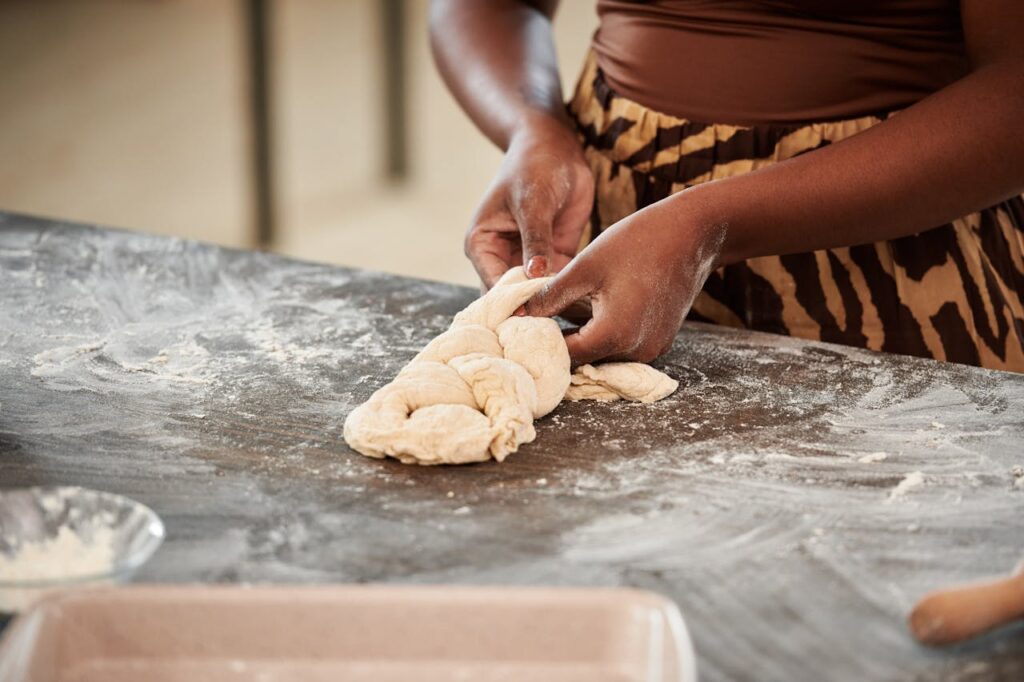
Use a large mixing bowl to combine flour, water, wild starter, olive oil, and salt. Expect a sticky, wet dough—more so than typical breads. Mix gently until all flour is incorporated and let sit for 30 minutes, giving the wild yeasts a head start.
Knead with Minimal Effort: Stretch-and-Fold Technique
With wet hands, pull one edge of the dough over onto itself. Rotate the bowl and repeat. Do this four times, then rest the dough for 30 minutes.
Repeat the gentle stretch-and-fold two more times at 30-minute intervals. This process strengthens the gluten and encourages open crumb, a hallmark when working wild fermented dough.
Focus on how the dough feels: it should become smoother and easier to handle as bulk fermentation progresses. If it tears, rest longer between sets.
- Pay attention to dough temperature. Wild yeasts work best at 72–78°F for steady fermentation and balanced flavor. Use a thermometer to check your dough’s temperature after mixing.
- Let the dough bulk ferment until it’s doubled—usually 3 to 6 hours depending on your room temperature and dough activity. Always watch for growth, not just time on a clock.
- Check the dough’s surface for bubbly, glassy texture. This means the wild fermented dough is alive and ready for shaping, crucial for open, airy focaccia crumb.
- If your dough rises too slowly, increase kitchen warmth or allow a longer rise. If it surges ahead, chill it in the fridge to naturally slow fermentation and develop flavor.
- Each stretch and fold adds elasticity; never rush. By following these physical signs, you’ll know exactly when wild fermented dough hits peak readiness.
When the dough springs back lightly when pressed, transfer to a well-oiled pan for the next phase. Never skimp on oil—it enhances crust texture and flavor.
Managing Time for Your Schedule During Bulk Rise
Some bakers prepare their wild fermented dough in the evening, then refrigerate overnight. The dough can be shaped straight from the fridge or allowed a brief warm-up.
- Prepare for weekends by starting your wild fermented dough early Friday night. Refrigerate after the final fold so you can finish focaccia baking Saturday morning.
- For weekday baking, let dough ferment at room temperature before dinner, then shape before bed and chill overnight, ready for baking before work or school.
- Include an extra daytime fold for even more gluten development. If delayed, leave dough in fridge up to 18 hours for deeper flavors and convenient scheduling.
- Keep a baking journal beside you. Document times, outcome, and sensory cues with each wild fermented dough batch to improve with each bake.
- Let your senses lead. If a batch seems sluggish, simply offer extra resting time—wild fermentation rewards patient observation over rigid planning.
Flexible fermentation fits around your life, providing great bread without tight time constraints. As familiarity grows, wild fermented dough will work smoothly into your routine.
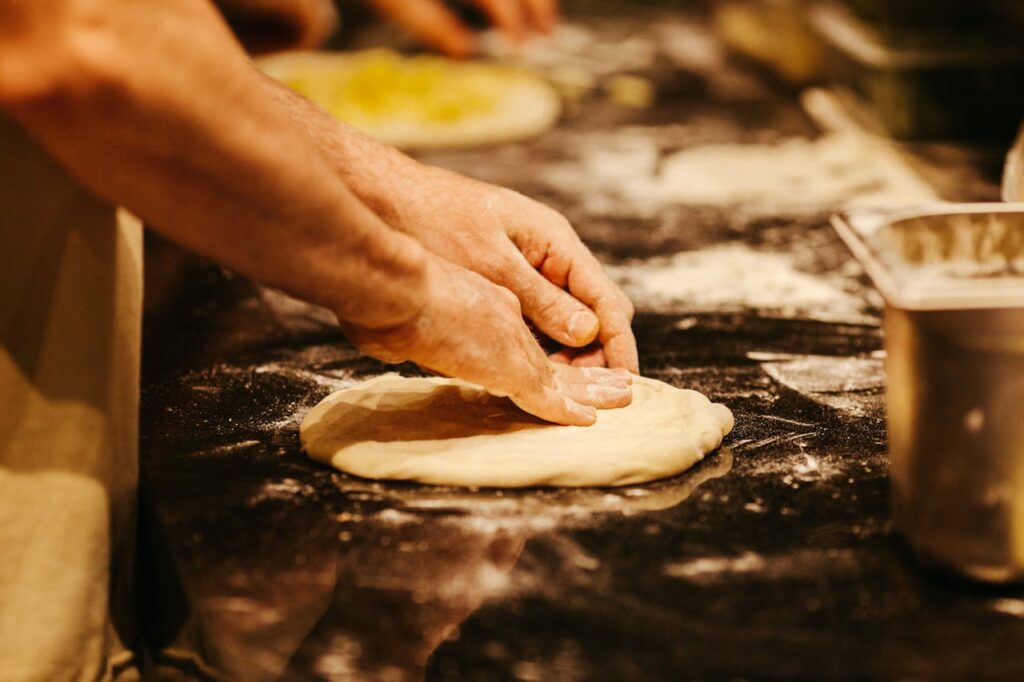
Shaping, Dimpling, and Final Proof Steps to Focaccia’s Signature Crumb
Molding wild fermented dough calls for a touch both gentle and attentive. Shape directly into an oiled pan—using oiled fingers, gently stretch and press the dough into corners.
Don’t rush—let the dough relax between stretches if it springs back. This prevents tearing and preserves airiness, giving wild fermented dough that signature honeycomb structure that defines high-quality focaccia.
Creating Dimples for Oven Spring: The Finger Test
Oil your hands and press fingertips into the dough, forming deep dimples. Hear soft bubbles pop as you press, releasing carbon dioxide and improving crumb openness in wild fermented dough.
Add toppings now: flaky sea salt, rosemary, or tomatoes work well. Press gently so they adhere without flattening the dough. The scene—family gathered, adding toppings—brings tradition to life in your kitchen.
Let the dough proof uncovered for about one hour or until puffy but still jiggly. Wild fermented dough may take slightly longer, so observe rather than clock-watch.
Scenario: Adjusting for Cold Weather Final Proof
If it’s chilly, double the proofing time or use your oven’s light as a warm spot. Check wild fermented dough with the fingertip test—if a dimple slowly springs back, it’s ready for baking.
Rushed proofing leads to dense, flat focaccia. Proper final rise unlocks wild fermented dough’s light crumb and golden crust, making patience fully worth it. Finer air bubbles mean better structure and aroma.
This attention to timing gives every home baker a fighting chance at bakery-level focaccia. Even wild fermented dough newcomers will see improvement with these tactile methods.
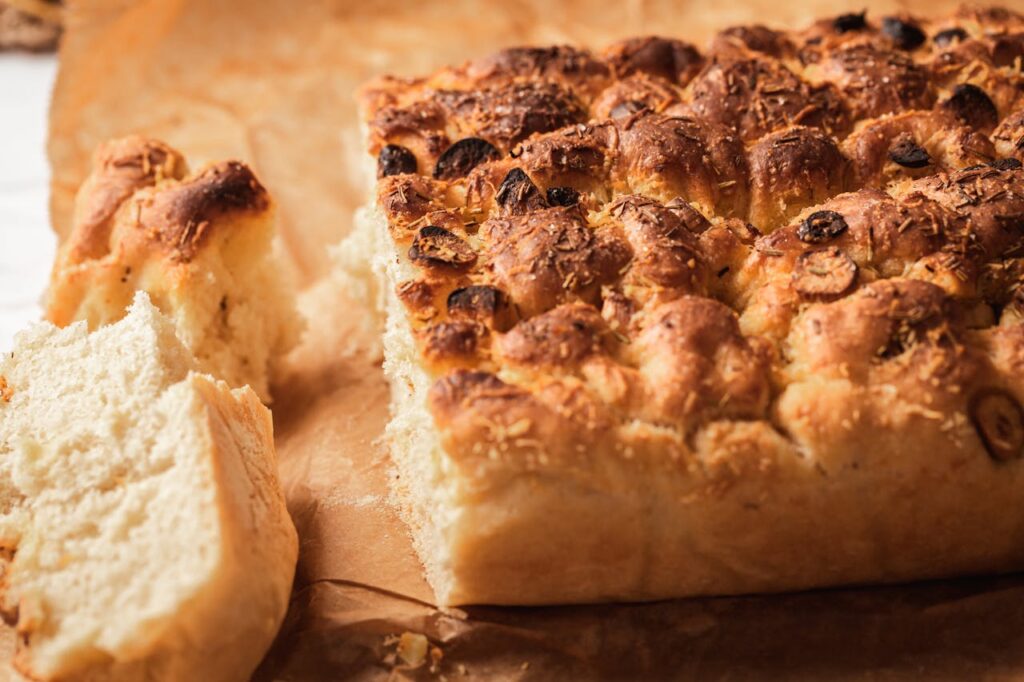
Baking for Golden Transformation: Aroma and Texture Revealed
High heat and a well-oiled pan unlock the magic of wild fermented dough. Every tray offers a bake that’s both visually striking and deliciously aromatic.
Preheat your oven to 450°F. Bake focaccia on the lower rack for optimal oven spring, ensuring wild fermented dough forms a crisp, caramelized bottom and pillowy crumb.
Color Cues: Judging Doneness by Sight and Smell
Golden edges and a toasted aroma signal readiness—wild fermented dough responds differently, so look for even browning and bubbling oil. Tap the focaccia lightly. A hollow sound means it’s done.
Lift focaccia from the pan and let cool on a rack. The wild fermented dough’s crust stays crisp, the interior steaming with deep, earthy aromas—a hallmark of wild fermentation technique.
Once cool, slice with a serrated knife. A savory aroma, springy crumb, and tangy aftertaste are all proof you’ve succeeded. Enjoy fresh or store tightly wrapped for best texture.
Alternative Pan Styles: Sheet Pan vs. Cast Iron
Sheet pans yield a classic focaccia—crisp yet light, good for larger gatherings. Cast iron produces thicker, crunchier edges, capable of highlighting olive oil flavor and wild fermented dough’s tanginess.
Both methods work. Try each and note subtle changes driven by the pan’s heat qualities, as wild fermented dough flavors react with metal surfaces.
Clean pans thoroughly between uses to keep wild fermented dough flavors fresh and avoid burnt residue affecting future bakes.
Serving and Storing Focaccia: Keeping Wild Aroma Alive
Cut focaccia into generous rectangles or wedge shapes. Serve with soups, salads, or olive oil for dipping—wild fermented dough’s flavor shines with simple accompaniments.
Leftover focaccia stays moist for two days, thanks to wild fermented dough’s superior water retention. Wrap tightly or store in an airtight container to preserve flavor and texture.
- Serve focaccia with herbed olive oil for a bright appetizer; the tang complements the fruitiness, celebrating wild fermented dough’s complexity.
- Use leftovers for sandwiches. Slice horizontally and fill with roasted vegetables or sliced meats for a substantial lunch that highlights focaccia’s balance.
- Toast day-old pieces. Rub with garlic and top with tomatoes—a rustic take that honors wild fermented dough’s robust aroma.
- Cube and bake for flavorful croutons. The open crumb absorbs soup beautifully and keeps a signature wild fermented tang.
- Freeze cut portions. Reheat in a 350°F oven for 10 minutes to refresh crust and aroma, keeping wild fermented dough’s best notes alive.
Sharing focaccia becomes a tradition. Wild fermented dough recipes invite community and encourage experiments with seasonal produce or new spices.
Conclusion: Elevate Everyday Baking with Wild Fermentation
Making focaccia with wild fermented dough isn’t just a ritual—it’s a pathway to unique flavor and a reflection of your care as a home baker. Every variable leaves its mark on the final loaf.
The complexity, aroma, and texture in wild fermented dough can’t be matched by shortcuts. With mindful practice, each bake brings you closer to mastering this living process and experiencing unforgettable bread at home.
Keep exploring new flours, different hydration levels, and creative mix-ins. Wild fermentation with sourdough is your ticket to endless discovery and bread that tastes deeply of place and time.
Frequently Asked Questions
How long does it take to prepare wild fermented dough for focaccia?
It usually takes 5 to 7 days to establish a reliable wild fermented starter from scratch. Daily feedings and a warm (but not hot) environment are important for dependable results. After that, the baking process typically spans a day with time for fermentation and proofing.
What flour works best for wild fermented focaccia?
Bread flour is the top pick due to its protein content, which builds structure during longer fermentation. However, half whole wheat or spelt flour adds nutty depth and supports wild yeast diversity, making the focaccia more aromatic and nutritious. Experiment to find your favorite blend.
Can I speed up the fermentation process?
Fermentation relies on living microbes, so patience is important. In warmer rooms, the wild fermented dough will rise faster, sometimes in as little as 3 hours. Avoid shortcuts with commercial yeast, as they won’t deliver the depth and complexity unique to wild fermentation.
My focaccia comes out dense. What went wrong?
Dense focaccia usually means underproofing or using a weak starter. Make sure the wild fermented dough is bubbly, doubles in volume, and passes the float test before baking. Also, ensure dough is fully developed with proper folding and proofing for the best open crumb.
How do I store leftover wild fermented focaccia?
Wrap any leftover focaccia tightly in plastic or place in an airtight container right after it cools. Store at room temperature for up to two days. For longer storage, freeze pieces and reheat as needed. This preserves the unique flavor and texture of wild fermented dough.