The comfort and aroma of wild fermentation sourdough start with the right setup. Your choice of storage containers shapes how well your active starter thrives during daily care and baking cycles.
Getting storage containers right matters even more as wild starters respond to airflow, material, and ease of use. The details here can create simpler routines and better bread, every week.
Dive in and learn which storage containers support active, lively sourdough starters and streamline your baking—because every detail, from jar to lid, influences what comes out of your oven.
Choosing the Ideal Container: Material and Size for Everyday Sourdough
By matching storage containers to your sourdough’s needs, you avoid contamination and reduce daily effort. Glass, plastic, and ceramic each bring unique benefits for active starter health.
A baker might say, “I want to see my starter bubble, but I don’t want to worry about stains or lingering smells.” The material you pick answers that exact need—let’s break down the pros and cons.
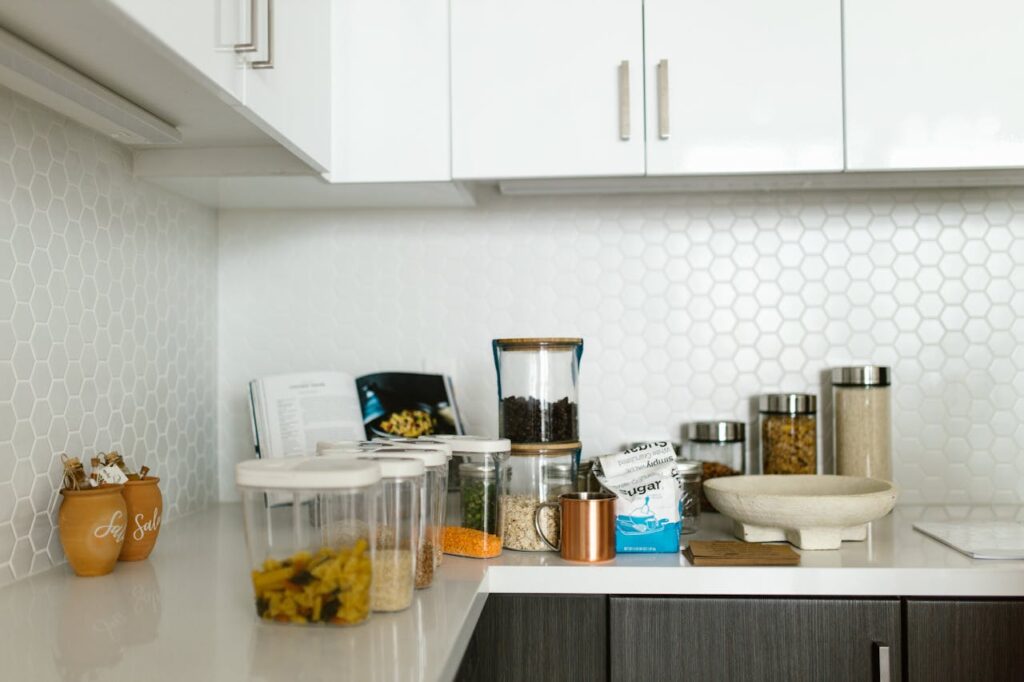
Glass: The Clear Winner for Monitoring Activity
Glass storage containers let you track your starter’s rise and fall with a glance. You spot bubbles, color, and hooch immediately—no guessing. Transparency also means you’ll catch problems before they take hold.
To use glass, select wide-mouth jars—think old pickle jars or new Mason jars—for easy access. Their smooth walls rinse swiftly, while thick glass won’t stain and resists food odors.
When using glass, always avoid sudden temperature shifts to minimize breakage. Transitioning from fridge to room temperature gradually protects both starter and container, keeping your fermentations consistent.
Plastic: Lightweight and Travel-Friendly, but Mind the Quality
Plastic storage containers stand out for portability and resistance to shattering, especially on busy counters. Look for food-grade, BPA-free options and avoid reused containers with lingering odors or scratches.
Some bakers keep a durable plastic tub labeled “winter starter” because it fits inside coolers easily. However, always check for lingering colors or smells after cleaning—fatty doughs can leave residues over time.
Scratch-free, transparent plastic works best. Never choose cloudy or scored containers since they can harbor microbes, even after washing. Replace with fresh, untarnished plastic when in doubt.
| Material | Visibility | Durability | Best Use |
|---|---|---|---|
| Glass | Excellent | Moderate | Monitoring fermentation; frequent feeding |
| Plastic | Good | High | Travel, lightweight storage |
| Ceramic | Low | High | Long-term storage; cool environment |
| Stainless Steel | Medium | High | Temporary holding; not for fermentation |
| Porcelain | Medium | Moderate | Short-term storage; elegant presentation |
Protecting Starters: Lids, Covers, and Preventing Contamination
Preventing unwanted bacteria or mold means paying close attention to how storage containers are covered. Your lid choice affects airflow, moisture control, and the ease of maintaining a healthy sourdough.
Lids come in solid, loose, and breathable forms. Each option works best in specific situations, such as bulk fermentation or refrigerated storage. Think through what you really need—flexibility helps avoid spoilage.
Outsmart Common Storage Challenges
Leave the lid ajar on your glass container when your kitchen is humid, promoting airflow while blocking dust. This basic adjustment changes the environment for your wild fermentation sourdough overnight.
- Use elastic covers or beeswax wraps to allow controlled breathing without letting air contaminants settle, so your starter develops a balanced aroma and consistent bubbles.
- Secure a layer of cheesecloth with a rubber band for short rests, offering airflow but screening out errant crumbs, fruit flies, or kitchen debris—especially after flouring the counter for shaping.
- Switch to airtight lids when placing storage containers in the fridge. This slows fermentation and extends time between feedings while preventing dry crusts from forming on top.
- Peel away thick hooch or darkened surface patches and sterilize the container if you’ve left your starter unused for days. Visible separation is a cue to double-wash and inspect your container’s condition.
- Label all jars immediately with a strip of masking tape. Record the feed date and time, so you won’t lose track of starter freshness or risk doubling up on feedings by mistake.
This approach prevents confusion on baking days and streamlines weekly baking prep—giving you a jump start on every feed cycle.
Making the Most of Easy-to-Clean Containers
Pick containers with wide mouths when practical, ensuring thorough cleaning after every feeding session. Residual dough dries hard and can harbor bacteria, so a sponge or bottle brush must easily reach all corners.
- Choose lids without deep threads or inner seals, because these trap dried starter and make regular cleaning annoying. Smooth, single-piece lids simplify life and prevent contamination hotspots from developing.
- Apply hot, soapy water and rinse under a brisk stream, scrubbing both the rim and lid. If sourdough residue dries, soak the parts for ten minutes before cleaning fully.
- Keep a dedicated sponge for your starter’s storage containers. Avoid using the same one as for greasy pans, so dough and oil never mix and tempt unwanted yeast or bacteria growth.
- Inspect for clouding, scratches, or discoloration every week. Replace any container that looks questionable, even if the damage seems minor—better to stay ahead of possible health risks.
- Air-dry containers before returning starters after a wash. Damp interiors support mold growth, but dry jars maintain that lively, clean scent you’ll love to check each morning.
Every cleaning step ensures your wild fermentation sourdough gets a fresh, uncontaminated home each cycle—and a better bake as a result.
Optimizing Storage Temperature and Environment
Consistent storage container placement supports steady fermentation and simplifies your feeding schedule. A spot near your oven gives gentle warmth for robust activity, while the fridge slows your starter when you need extra time.
Storage containers behave a bit like housemates—move them closer to the heat when you want extra bubbling, or into the fridge when vacation calls. Just be sure you adapt routines to the new environment after any move.
Hot Spots: When and Where to Place Your Container
On a chilly morning, keep your starter in a glass jar near your stove. This zone boosts activity through gentle ambient heat—up to 75 degrees, ideal for lively wild fermentation sourdough.
In hot weather, shift storage containers to a cooler pantry or into the basement. Professional bakers call this “finding the sweet spot,” reducing sourness by moderating the wild yeast’s pace.
Always avoid direct sunlight on your starter, even in glass containers. Light degrades natural acids and dries the surface quickly, forcing extra feedings or risking an uneven rise in your dough later.
Cold Storage: Fridge Maintenance and Best Practices
Put your wild fermentation sourdough starter in the fridge inside airtight storage containers to slow activity. Mark the feed date on the lid or a sticky note, so monthly maintenance becomes simple and routine.
When pulling a starter from the fridge after a week or more, discard the top layer, feed as usual, and wait for bubbly growth before baking. This adjustment revitalizes the mix and ensures even fermentation performance.
After extended chilling, inspect container walls and lids. Condensation from temperature swings can encourage off odors over time. Dry the jar thoroughly before refilling to prevent musty scents and safeguard flavor.
Troubleshooting and Adjusting Storage Based on Starter Behavior
Clear storage containers make spotting sluggishness, off odors, or inconsistent bubbling immediate. A seasoned baker quickly knows, “My starter’s not rising evenly”—and fixes the cause, not just the symptom, without losing momentum.
Routinely check for foam, streaks, or color changes every day. Adapt your storage container or placement when signals indicate starter stress, using concrete steps to restore health and performance.
Signs Your Container Needs an Upgrade
If you notice a persistent smell, even after washing, consider swapping to glass or new plastic storage containers. Odors that stick mean unwanted bacteria or yeast may have moved in.
Sticky or gritty texture suggests incomplete cleaning. Switch to a container with a wider mouth, making it easier to scrub corners where flour and dough collect unnoticed between feedings.
Any recurring mold, streaks, or hooch that doesn’t resolve with regular feeding is your cue to change containers, wash thoroughly, and even refresh your starter if needed.
Routines for Maintaining Ideal Storage Conditions
Establish a weekly ritual: bake with your starter, then give all storage containers a full wash. Pair this with a quick visual check for microcracks or thinning plastic that might otherwise escape notice.
Between washes, keep lids loosely covered unless refrigerating. Wipe away excess dough at each feeding, so your new layers have a clean surface for expansion and breakdown.
Write a brief log entry after any major change—new jar, rearranged shelf, or adjusted lid. This record quickly clarifies which tweaks led to more bubbles or solved odor issues later.
Designs That Simplify Routine and Encourage Consistent Feeds
Opting for storage containers with easy-access details can transform tedious routines into smooth tasks. Jars with graduated markings or clear sides provide immediate visual feedback and keep you on track for each feeding.
A baker juggling kids and chores appreciates a flip-top jar for one-handed opening. Details like these save time and support wild fermentation sourdough habit-building without adding stress to busy weekdays.
Containers Supporting Streamlined Daily Tasks
Select containers that stack securely if you store multiple starters or flavor variations. Stable stacks save shelf space and make quick check-ins safer when running a tight kitchen.
Wide mouths simplify adding flour and water. This design allows thorough mixing with a spatula or spoon—useful when refreshing a sluggish starter to restore a healthy state quickly.
Attach a permanent marker or grease pencil to the storage location. Record daily feed times directly on glass or plastic, then wash off after each cycle—bakers call this a life-saver for busy mornings or late-night bakes.
Observing Feedback and Fine-Tuning Storage
Monitor rise lines on glass containers to spot the starter’s peak. Mark the line at feeding and observe its progress—flat means the room’s too cool or the starter needs more frequent refreshment.
When bubbles swarm but aroma turns sharp, experiment with shorter feeding intervals instead of switching containers too quickly. Adapting routine rather than blaming equipment can quickly restore desired performance.
If your container routinely fogs with condensation, choose one with better airflow or reduce fridge time. Clean, dry storage containers need to support—not smother—the wild fermentation sourdough you rely on.
Comparing and Replacing Storage Containers as Styles and Needs Shift
As baking habits change, your storage containers should evolve too. Moving from weekend hobbyist to daily baker means reassessing what shape, size, and lid type deliver the least stress and freshest sourdough.
Evaluate all containers monthly—test for chips, warping, or weakened lids that might undermine routines or risk contamination. Proactively replacing one saves an entire bake from disappointment down the road.
Knowing When to Switch Out Your Standard Jars
After a year or heavy use, plastic containers may lose luster even with perfect cleaning. Transfer starters to a fresh glass jar each spring, just as you might swap old garden gloves for new each season.
Unexpected breakage, warped shapes, or cloudy panels signal immediate replacement. Sometimes a recycled pickle jar works both as a reward and as a conscious reset for routines.
Repurpose older containers for flour scooping or mixing—never feed your wild fermentation sourdough in a vessel that looks tired or worn. This small detail preserves flavor and confidence in each bake.
Trying New Container Styles for Unique Fermentation Methods
Square and rectangular storage containers suit fridge stacking and save shelf space, especially if you nurture both rye and wheat starters. Each container should feel inviting and functional for daily feeds.
Store larger batches in shallow, wide-mouth bowls for rare high-volume baking days. Return to tall, narrower jars for regular care—stealing a play from professional bakers who juggle multiple wild fermentation sourdoughs at once.
If scaling up for market bakes, invest in large, glass fermentation vessels to mix and store efficiently. Mark measurements and feeding schedules on each with colored tape for quick identification and cleaner workflows.
Practical Takeaways: Setting Yourself Up for Wild Fermentation Success
Making smart choices with storage containers improves wild fermentation sourdough health, simplifies routines, and keeps every loaf flavorful. Recap simple changes—select material wisely, prioritize easy cleaning, and adapt to shifting daily habits quickly.
Each container swap or location shift makes a real difference—visible in bubbles, aroma, and the way your dough responds to kneading. Relying on best practices ensures your sourdough experience remains smooth and satisfying, batch after batch.
Your effort leads directly to better bread. By treating storage containers as core tools—rather than background equipment—you’ll shape a healthier starter and a more joyful wild fermentation journey every time.
Frequently Asked Questions
What type of storage containers will keep my wild fermentation sourdough starter at its healthiest?
Glass containers with wide mouths are ideal. They let you see activity and clean thoroughly. Choose ones with secure but not airtight lids for daily use, switching to airtight for refrigeration or breaks between feedings.
How frequently should I clean my starter’s storage containers?
Wash thoroughly every week, or whenever residues or odors develop. If you notice streaking, mold, or persistent smells, change containers immediately and sanitize all parts before transferring your starter.
Does the size of the container affect starter freshness or health?
Always select a container at least twice the volume of your starter after feeding. This allows room for bubbling and prevents overflow. Too-small containers suffocate fermentation and create unwanted acidity or crust buildup on the rim.
What’s the best cover for my container: tight, loose, or breathable?
For room temperature storage, lightly cover with a loose lid or layer of cloth to balance airflow and protection. Use airtight covers strictly for refrigeration to slow fermentation but always let the starter breathe during recovery.
Why do my plastic storage containers take on odors even after cleaning?
Plastic is porous and tends to retain smells from sourdough acids over time. Switch containers if this happens and opt for glass or fresh BPA-free plastic. For stubborn odors, soak in baking soda water before replacing entirely.