The aroma of freshly baked sourdough links generations, but the secret behind its tang lies in naturally capturing wild yeast from fruit skins, a method many home bakers now cherish.
Baking enthusiasts seek ways to capture wild yeast to create bread with complex flavor, texture, and a story deeply rooted in nature’s rhythms and your kitchen’s unique ecosystem.
This approachable guide shares specific steps, practical checklists, and realistic examples for seamlessly capturing wild yeast at home—transforming kitchen experiments into a wild fermentation sourdough adventure.
Setting Yourself Up for Capturing Wild Yeast Success
To capture wild yeast effectively, build the right environment and attitude from day one. You’ll ensure a vibrant starter by using clean jars, precise timing, and the freshest fruit skins you can source.
Before diving in, gather materials: ripe fruit (like grapes or apples), a sterilized glass jar, whole grain flour, and filtered water. Arranging your station is the very first win for wild fermentation sourdough.
Visual Indicators of a Healthy Starter
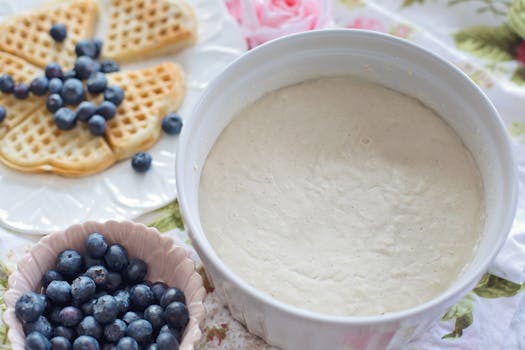
Look for small bubbles and a pleasant, fruity aroma as you capture wild yeast. A creamy consistency that rises and falls signals starter health. When you see active bubbling at the jar’s sides, you’ve created the right microbial setting for sourdough.
A healthy starter slightly domes at the top after feeding. If you tap the jar, lively bubbling sound means wild yeast is thriving. Discard any batch with skin, fuzz, or a strong foul odor.
Rely on sight, smell, and sound—these are the key indicators that your wild fermentation sourdough starter is maturing the way it should, making your bread flavorful and safe.
Timing Each Step for Best Results
Timing matters: Wait 24 to 48 hours for the first visible activity. If there are no bubbles by day three, refresh your mixture by adding a spoonful of flour and a splash of water.
Feed your mixture daily at around the same time. Think of it like tending a new plant: routine brings consistent growth. If activity stalls, swapping in new fruit can reinvigorate the wild yeast population.
Staying on schedule leads to a vigorous sourdough starter, which benefits from regular care and offers a predictable pattern for fermenting bread. Mark your calendar to stay on track.
| Fruit | Wild Yeast Potential | Flavor Profile | Starter Outcome |
|---|---|---|---|
| Grapes | Very High | Fruity, tangy | Rapid bubbling, robust starter |
| Apples | High | Sweet, mellow | Mild flavor, moderate activity |
| Plums | Moderate | Earthy, sweet | Slightly slower, unique aroma |
| Pears | Moderate | Subtle, floral | Gentle rise, delicate starter |
| Blueberries | Lower | Tart, floral | Subtle bubbles, slower colony growth |
Choosing Fruit and Flour for Reliable Wild Yeast Capture
The choices you make about fruit and flour shape every aspect of your future loaf. Wild fermentation sourdough hinges on picking high-quality, unsprayed fruit and whole grain flour to encourage a robust yeast community.
Select firm, unblemished fruit picked on dry days. Whole wheat or rye flour offers a nutrient-rich, enzyme-rich food source—critical in consistently capturing wild yeast from your kitchen environment.
Why Local and Organic Fruit Performs Better
Locally grown, organic fruit is less likely to carry fungicides or waxes, which can suppress wild yeast colonies. Rinsing gently—but never scrubbing off the natural bloom—keeps native microbes in place for starter success.
- Pick firm, ripe fruit: Offers more wild yeast, especially from natural surface bloom
- Avoid supermarket coatings: Coated fruit loses native yeast, so source from a local market or backyard tree
- Choose whole grain flour: More minerals and naturally occurring nutrients support rapid wild yeast development
- Avoid chlorinated water: Use filtered or spring water to protect delicate wild yeast in the first week
- Keep ingredients at room temperature: Yeast activity depends on warmth; cold slows fermentation and delays starter maturity
Combine these habits and you’ll give wild fermentation sourdough its best chance for robust, consistent performance in home projects.
Storing and Rotating Your Supplies
Keep your whole grain flour and fruit cool, dry, and away from direct light. Rotate stock every month to avoid stale ingredients that could slow down your capturing wild yeast process.
- Store flour in a tightly sealed jar: Protects from moisture, pests, and off flavors—this keeps it fresher and more effective for wild yeast capture
- Re-seal fruit bags promptly: Unsealed bags dry out and can invite mold, damaging your starter’s environment
- Label with purchase date: Knowing when you bought flour or picked fruit helps you use the freshest first for best yeast potential
- Use up older stock for test bakes or discard feeds: Reserve your freshest, most vibrant fruit for starter creation
- Keep water in glass, not plastic: Glass jars or bottles maintain water purity for supporting the capturing wild yeast process
Following these small habits maintains ingredient quality, making wild fermentation sourdough more reliable and delicious every time you bake.
Stirring, Feeding, and Covering Strategies for Stronger Growth
Stir the mixture twice daily for oxygen. Feed the starter at consistent times. Cover loosely with a cloth or lid—never airtight—to allow natural airflow required by wild yeast colonies.
Consistency pays off: Each time you stir and feed, gently mix down any crust to reincorporate it. A living, breathing environment encourages diverse microbes, producing a mature sourdough.
Managing Temperature for Optimal Wild Yeast Activity
Maintain a kitchen temperature close to 70-75°F (21-24°C). Capture wild yeast in a slightly warmer spot to speed up metabolic activity—but never let it get too hot, or you’ll risk starter stress and bitter notes.
Consider placing your jar near—never on—a sunny windowsill. Alternatively, put it on top of your refrigerator where ambient warmth helps wild fermentation sourdough develop consistent bubbles and pleasant tang.
For cooler kitchens, wrap the jar in a kitchen towel and check progress daily. Stable warmth fosters reliable yeast multiplication and smoother sourdough bread rises for new bakers.
Recovering if Mold or Stalling Occurs
If mold appears, discard and start over; don’t try to salvage a contaminated batch. A sluggish starter responds well to a new piece of fruit, extra flour, and a dash of filtered water.
Monitor your starter by sight and smell at every feed. A small brown liquid (“hooch”) isn’t dangerous; stir it back or pour off if the scent remains clean and sour.
If your mixture won’t rise after five days, sprinkle more whole grain flour and set in a warmer area. Fresh air, patience, and steady feeding lead to reliable capturing wild yeast results each time.
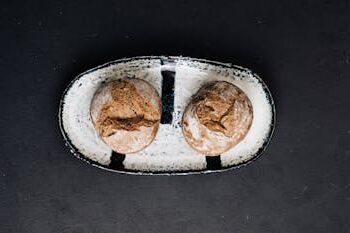
First Bake: Using Fruit-Skin Starters in Wild Fermentation Sourdough
Once your starter smells fruity-sour and nearly doubles six to eight hours after feeding, it’s time for your first wild fermentation sourdough loaf. This moment connects you with bakers who value capturing wild yeast for flavor depth.
Knead gently, using equal parts active starter, flour, and warm water. Stretch and fold the dough every half hour, over two to four hours, to develop gluten and build structure in your naturally leavened loaf.
Understanding Dough Feel and Timing
Wild fermentation sourdough feels supple but tacky during bulk fermentation. The dough should spring back slowly when pressed but hold a slight indent—a sign your captured wild yeast is fermenting properly.
If the dough tears or feels dry, incorporate a teaspoon of water and knead again. Baking with wild starters takes a light hand and careful observation, rather than forceful kneading or aggressive shaping.
Once shaped, proof the loaf until it passes the “poke test”: a gentle finger poke springs back slowly without collapsing. This reliable cue signals readiness for baking and full yeast development.
Translating Starter Activity to Baking Predictability
A bubbly, sweet-smelling starter means your bread will reliably rise, even when using captured wild yeast. However, the window for peak rising is about four hours after feeding—bake during this window for height and structure.
On your first bake, mark start times—a future reference for tweaking hydration, salt, or flour. Track how air pockets and crust form, and adjust your process for next time as you gain confidence with wild fermentation sourdough.
Every successful bake builds the relationship between starter activity and reliable bread texture that’s unique to your kitchen and fruit choice—making wild baking a personally rewarding process.
Troubleshooting: Pinpointing and Fixing Common Issues
Poor bubble formation, a sluggish rise, or harsh odors indicate a mismatch in fruit, flour, or maintenance. Tweaking just one habit brings most wild fermentation sourdough starters back into top form in your home bakery.
If your capturing wild yeast process feels inconsistent, record exact times, amounts, and outcomes in a kitchen notebook. Small changes—like swapping to a different fruit or altering feeding schedules—may transform results within days.
Adjusting for Temperature Swings
Beans or rice bags warmed in the microwave work well to gently line a proofing area for colder climates. Keep your jar in an insulated lunch bag overnight if needed. Stable warmth fosters robust yeast populations efficiently.
During heat waves, move your starter to a cooler cupboard or basement. Drastic heat swings cause overly acidic, dense doughs—so aim for a steady, moderate environment whenever possible for wild fermentation sourdough.
After a temperature shift, expect a day’s lag before full activity returns. Recording conditions after changes lets you spot patterns that work for your kitchen and fruit blend.
Fine-Tuning Feed Ratios and Hydration
If your starter runs thin and smells sharp, reduce water and increase whole grain flour during each feed. Dense starters benefit from a larger water splash, especially when using drier climates or hard flour blends.
Ratio tweaks change the pace and style of fermentation. A thick, pancake batter consistency invites slow but steady wild yeast growth, perfect for early-stage starters. Thinner batters rise faster but need more frequent feeds.
Cautious adjustments, tracked in a log, help dial in capturing wild yeast for consistency—resulting in an active starter that supports beautiful, flavorful sourdough bread with every bake.
Summing Up Natural Wild Yeast Capture for Confident Home Baking
Explore wild fermentation sourdough deeper by capturing wild yeast from fruit skins, unlocking bread full of natural character and subtle aromas distinct to your home and seasons.
This practical approach values everyday mindfulness: consistent stirring, wise ingredient choices, and timely feeding routines. Each element supports yeast health, resulting in flavorful bakes and minimal disappointment.
As you refine your technique and trust your senses, your unique wild starter becomes a lasting household tradition—a natural extension of hands-on baking and creative discovery guided by nature.
Frequently Asked Questions
Can I use any fruit for capturing wild yeast?
Use ripe, unsprayed fruit with visible bloom. Grapes and apples work best, but avoid waxed or heavily sprayed produce. Local and organic options encourage richer wild yeast colonies for sourdough.
Is it normal for my starter to smell fruity or sour at first?
Yes, an evolving aroma suggests successful capturing wild yeast. Expect mild sweetness and acidity early on—pungent, spoiled, or rotten smells signal contamination and require starting over for safety.
How can I tell if the wild fermentation sourdough starter is strong enough to bake with?
The starter should double in volume within six to eight hours of feeding, have many bubbles, and a mildly tangy aroma. A failed rise or lack of bubbles means more time or another round of fresh fruit may be needed.
Can I speed up the process of capturing wild yeast?
Maintain starter warmth (70-75°F), use whole grain flour, and fresh, ripe fruit to encourage quick activity. Resist adding commercial yeast—true wild fermentation takes a few extra days but rewards with deeper flavor.
What should I do if the starter forms a thick crust or brown liquid?
Stir back in any crust or pour off excess liquid (“hooch”) as long as the scent is pleasantly sour. These changes are normal in wild fermentation sourdough as the microbial balance stabilizes with regular feeding.